Note: The text on this page is extracted from the METW Unlimited Rulesbook and has no modifications.
INTRODUCTION
During the Third Age, the Valar sent five Maiar to Middle-earth to unite and counsel the Free Peoples in their struggles against Sauron, the Dark Lord. However, they were forbidden to dominate the peoples of Middle-earth or to match the power of Sauron with power. These five were known as “Wizards” (also called Istari) in Middle-earth, and individually they were called: Gandalf, Saruman, Radagast, Alatar, and Pallando.
In Middle-earth: The Wizards, you play one of these five Wizards. Your goal is to marshal the forces of the Free Peoples so that Sauron can be resisted until the One Ring is destroyed. Since your fellow Wizards do not agree on how best to accomplish this goal, you must battle for the minds, bodies, and souls of the Free Peoples.
In The Lord of the Rings, Gandalf was the only Wizard to succeed. Saruman was corrupted by power, Radagast “went native,” and Alatar and Pallando disappeared into the East. Only Gandalf remained true to his task, marshalling the characters and forces that withstood Sauron long enough for the Fellowship to destroy the Ruling Ring.
“Evil forces” are represented by hazards that the players use against one another. For example, if you move a character into Moria, your opponent could play a Troll card as a hazard. These hazards are not “controlled” by the Wizards, but rather they represent the forces of Sauron, who himself is in a “dormant” or hiding phase. All players are “good,” so conflict takes the form of hazards and direct attempts to “persuade” or “dominate” each other and each other’s characters and forces, rather than the form of direct conflict.
Note: For purposes of readability, these rules use the standard masculine pronouns when referring to a person of uncertain gender. In such cases, these pronouns are intended to convey the meanings: she/he, him/her, etc.
USING THIS RULESBOOK
These rules are organized into four sections: the Starter Rules, the Standard Rules, the Optional Rules, and the Appendices. The Starter and Standard Rules are for a two-player game; multi-player rules are provided in the Optional Rules.
The introductory material on pages 4-8 provides a brief player turn summary, player notes, and definitions of commonly used terms.
The Starter Rules —The Starter Rules contain all of the guidelines you need to play METW. They have been designed to simplify teaching the game and to speed up play. You should use the Starter Rules if you and your opponent have never played this game before or if one of you only has access to a starter deck.
If you are already an experienced player of collectible card games, you might read the next couple of pages and the sections that are not boxed. As you play, you can refer to the other material that details the more complex rules and situations that may arise during play.
The Standard Rules — These rules assume you have already played several games using the Starter Rules. The Standard Rules consist of additions and extensions to the Starter Rules that make play and deck building more flexible, exciting, and interesting. We recommend that experienced METW players use all of the Standard Rules.
The Optional Rules — Interesting variations to the standard rules. Before play begins, both players must agree on which optional rules are to be used.
The Appendices — An index, credits, keys, the Full Player Turn Summary. The color insert includes a map and a key to the cards.
BRIEF PLAYER TURN SUMMARY
Play consists of a series of “Player Turns.” During your turn, follow the steps outlined in this turn summary. Then, your opponent does the same during his turn. You and your opponent alternate turns until the game ends. This turn summary is included here to give you an idea of how play proceeds; see Full Player Turn Summary.
Untap Phase — Each of your characters may do one of the following: Untap or Heal (if at a Haven site). In addition, untap (see Tapping and Card Positions) all of your other tapped non-site cards.
Organization Phase — You may take the following actions in any order: play one character (if allowed) or your Wizard (if available), reorganize your companies, transfer items between characters (corruption checks required), and store items (corruption checks required). In addition, each of your companies may plan its movement by playing a new site card face down on its present site card.
Long-event Phase — Discard your resource long-events and your opponent’s hazard long-events. Play new resource long-event cards.
Movement/Hazard Phase — One at a time, each of your companies takes the following actions. The company turns over its new site card (if it has one); its current site becomes its site of origin. If the company moved to a non-Haven site, you may draw up to the # of cards indicated by the site that it is moving to (at least one card must be draw); your opponent does the same. If the company is moving to a Haven site, you may draw up to the # of cards indicated by the site that you are moving from (at least one card must be drawn); your opponent does the same. Next, your opponent may play allowable hazard cards on the company; the maximum number of hazards that may be played on a company is equal to the size of the company (to a minimum of two). Finally, remove the site of origin card and each player discards or draws so that he has eight cards in his hand.
Site Phase — One at a time, each of your companies may take the following actions at its current, untapped site. The company decides to enter and explore the site. First, if the site has an automatic-attack, it attacks the company. Then, the company may attempt to play one item, ally, faction, or information resource card that is “playable” at that site. A character in the company must tap to make this attempt. If the card is successfully played, tap the site.
End-of-Turn Phase — Each player may discard one card. Then each player must draw or discard so that his hand has eight cards.
PLAYER NOTES
- Site cards (and region cards in the Standard Game) represent the geography of Middle-earth. They are used to control the acquisition of resources, but they should not direct play. Instead, a player should examine the resources in his hand and then select a nearby site to travel to. Initially, do not worry too much about which site to use, just pick one that has the resource type you want to play. It also helps if you preselect the location cards you are most likely to use when you put together a play deck.
- In METW you will draw multiple cards each turn, and in some cases you will have to discard a number of cards each turn. Don’t let this worry you, it’s part of the flow of play. Just keep cards that are immediately useful during the next turn or that are crucial to your overall strategy (i.e., your primary resource acquisition strategy).
Notes For Players of other Collectible Card Games
If you have played other collectible card games (CCG), there are several key factors to keep in mind:
- METW is less tactical and more strategic than some other CCGs. There is combat, but it is not the dominant focus of the game.
- The players in METW are in direct competition with each other to marshal resources. However, only hazards directly attack the players’ characters and they are handled in a less controlled fashion (e.g., they are only played during your opponent’s movement/hazard phase, hazard creatures do not remain in play, etc.).
- For timing purposes, all cards in METW are played and tapped with the same “speed” (effects take place instantly). But, a player may only play resource cards during his own turn, and a player may only play hazard cards during his opponent’s movement/hazard phase.
Clarification: The card, Twilight, is an exception to this rule-it can be played at anytime, either as a resource or as a hazard (it does not count against the hazard limit). Certain other cards specifically state when they may be played.
COMMONLY USED TERMS
- Action: The various activities that you and your opponent can perform during play are called actions. Typical actions include playing a card, tapping a card, revealing a card, etc.
- Ally: An ally is a resource that represents a personality (i.e., entity) that can be recruited to help the Free Peoples (e.g., Tom Bombadil, Treebeard, etc.).
- Attack: Combat consists of one or more attacks that must be resolved one at a time. An attack consists of one or more strikes.
- Attribute: Each character’s abilities are defined by the following attributes: race, skills, direct influence, prowess, body, mind, marshalling points, special abilities.
- Automatic-attack: An attack that must be faced to enter and explore a site.
- Body Check: When a character is wounded, he must make a body check to determine if he is eliminated. When all of a creature’s strikes fail, a body check is made for each of its strikes to determine if the creature is eliminated.
- Body: A character’s or creature’s body is a measure of how difficult it is to physically eliminate him.
- Chain of Effects: A series of declared actions made in response to one another is called a chain of effects.
- Character: A person that is working for the cause of the Free Peoples. If in play, each of your characters is under the influence of your Wizard.
- Company: During play, you may organize your characters into groups called companies.
- Corruption Card: A hazard card that gives a character corruption points.
- Corruption Check: A modified roll made to determine if a character is discarded or eliminated due to accumulated corruption points.
- Corruption Points: This reflects the total amount of corruption a character has accumulated due to the effects of various hazards and resources.
- Creature: A creature is a hazard card that can be used to directly attack one of your opponent’s companies.
- Current Site Card: A company has a current site card associated with it-the company is located at that site.
- Direct Influence: A measure of a character’s ability to control other characters and to influence factions and your opponent’s resources.
- Event: An event is either a resource card that is not an item, ally, or faction; or it is a hazard card that is not a creature. Based upon how long it stays in play, there are 3 types of events: short-events, long-events, and permanent-events.
- Exhausting a Deck: Your play deck is “exhausted” when you draw its last card.
- Faction: A faction is a resource that represents a group of people or creatures. A faction can be recruited to help the Free Peoples (e.g., Riders of Rohan, Elves of Lindon, etc.).
- Follower: A character that is controlled by another character’s direct influence.
- Free Council: Marshalling points are tallied and the winner of the game is determined at the Free Council.
- General Influence: Each player has 20 points of general influence to use to control his characters.
- Hazard Limit: A company’s hazard limit is equal to two or the size of the company, whichever is greater. The maximum number of hazards that can be played on a company during a given movement/hazard phase is equal to its hazard limit.
- Hazards: Hazard cards represent evil forces and natural dangers. You may play hazard cards only during your opponent’s movement/hazard phase.
- Healing: This consists of moving a character from a wounded state to a tapped state.
- Home Site: A character may be brought into play at his home site or at a Haven.
- Influence Check: In certain situations, a player can make an influence check to attempt to bring a faction into play or to disrupt his opponent’s control over one of his resources.
- Item: An item is a resource that represents an object that can be acquired and used to help the Free Peoples. The different types of items are: minor, major, greater, gold ring, and special.
- Keyed: A hazard creature may only be played against a company if the creature is “keyed to” the company’s site or site path.
- Location Deck: A player’s site and region cards.
- Long-event: Long-events last approximately two turns, one of yours and one of your opponent’s.
- Making a Roll: Two six-sided dice (2D6) should be used to generate random values during play. This is called “making a roll.” To make a roll, roll 2D6 and add the two results together.
- Marshalling Points: During play you receive marshalling points from: control of resources, destruction of evil forces, and various other actions. The winner is the player with the most marshalling points at the end of the game.
- Mind: A character’s mind determines how many influence points are required to keep this character in play
- Movement: During a player’s turn, he may move each of his companies from its current site to another site.
- New Site Card: When a company moves, it leaves its current site card and travels to its new site card.
- Permanent-event: The effects of a resource permanent-event last until the card is discarded due to conditions stated on its card.
- Play Deck: Each player has a play deck that consists of his resource, hazard, and character cards. During play, each player draws cards from his play deck.
- Prowess: A measure of a character’s offensive capabilities in combat.
- Race: An attribute that helps define a character. The races are: Dúnadan, Dwarf, Elf, Hobbit, Man, and Wizard.
- Region: The various lands of Middle-earth are represented by regions.
- Resources: Resource cards represent good forces and various advantageous occurrences. You may play resource cards only during your own turn.
- Short-event: A short-event card is discarded immediately after it is played. The effects of some short-events last for a specific period as stated on their cards.
- Site of Origin: At the beginning of its movement/hazard phase, a moving company’s current site card becomes its site of origin-the company is considered to be en route to its new site card (i.e., the company is moving).
- Site Path: The site path of a site is the sequence of regions between the site and its nearest Haven as listed on the site’s card. A company’s site path is the sequence of regions between its site of origin and its new site.
- Site: Sites represent places that characters can visit in Middle-earth.
- Size: A company’s size is equal to the number of characters in it, with each Hobbit character only counting half (round up).
- Skill: An attribute that helps define a character. The skills are: Diplomat, Ranger, Sage, Scout, Warrior.
- Standard Modification: Most faction cards list some “standard modifications” to the influence check based only upon the race of the character that was tapped to make the influence check.
- Storing Cards: Certain cards (e.g., items, information, etc.) can be stored if they are at a Haven. Such a card is removed from play and placed in its player’s marshalling point pile.
- Strike: An attack consist of one or more strikes. Each strike targets a character and is resolved by making a roll.
- Tapping/Untapping a Card: Normally, during play, each of your cards is placed so that its bottom is towards its player. During play certain cards must be “tapped” when they are used-this is a record keeping mechanism to keep track of card usage. To tap a card, rotate it 90° so that it is turned sideways-to untap a card, rotate it back 90° to its normal position.
- Transferring Items: An item is transferred when it is moved from the control of one character to another.
- Unique: There can only be one copy of each unique card in play at a time. Each player can only have one copy of each unique card in his play deck and starting cards combined.
- Wizard: Each player plays one of the five Wizards sent to Middle-earth to unite and counsel the Free Peoples.
- Wounded: A wounded character is damaged but not eliminated. When one of your characters is wounded, his card is placed with its top towards you.
PART I · THE STARTER RULES
To get a general idea of how to play, read the Starter Rules sections that are not boxed. Later you can refer to the boxed sections for more information on special situations.
Random Values
Two six-sided dice (2D6) should be used to generate random values during play. This is called “making a roll.” To make a roll, roll 2D6 and add the two results together.
Note: If dice are not available, a random value can be generated by drawing a card from your play deck. Each card in a play deck has a number on the right side just below the center. You can use this number as the random value, then discard the card. Do not use this method if dice are available!
1 · THE VICTORY CONDITIONS
The game ends when one of the following occurs during play:
- If your Wizard is “eliminated” (i.e., through combat or corruption) — your opponent wins.
- If you move The One Ring to Mount Doom and play certain cards — The One Ring is destroyed and you win.
- Otherwise, the winner is decided at the Free Council. This council is called when one of the following occurs:
- When each play deck has been exhausted once, the council starts at the end of the current turn.
- After you have exhausted your play deck for the first time, you may choose to call the council at the end of any of your turns. The council starts at the end of your opponent’s next turn (i.e., your opponent gets one last turn).
- You may choose to call the council at the end of your turn if you have accumulated at least 20 marshalling points. The council starts at the end of your opponent’s next turn (i.e., your opponent gets one last turn).
Note: If one or both players only has access to a starter deck (76 cards), this requirement of 20 marshalling points should be lowered to 18.
THE FREE COUNCIL
Just before the Free Council, each character must make a corruption check. The player who took the last turn makes corruption checks for his characters first.
At the Free Council, the leaders of the Free Peoples decide which Wizard’s advice is best to follow. This is based upon a comparison of the resources each of the Wizards has marshalled.
Clarification: Characters do not automatically untap when the Free Council is called. A character may only untap during his own untap phase.
After all characters have made their corruption checks, the game ends if one Wizard has failed his corruption check (the other player wins). If both Wizards fail their corruption checks, no one wins-both players lose (if you have to, roll dice and the high roller is the winner).
The winner of the game is the player that has gathered the most marshalling points from:
- Control of resources: characters, allies, items, and factions.
- Destruction of creatures and/or evil forces.
- Carrying out the instructions on resource cards.
- By avoiding negative points which accrue when certain characters that you control are eliminated (e.g., Aragorn II, Galadriel, Elrond, Círdan, Frodo, and Bilbo).
Marshalling points are printed on the top left corner of the cards that award them.
Note: You may find it useful to use pencil and paper or extra dice to keep a running total of marshalling points.
Clarification: If both players have the same number of marshalling points at the Free Council, the game ends in a tie-both players win (if you have to, roll dice and the high roller is the winner).
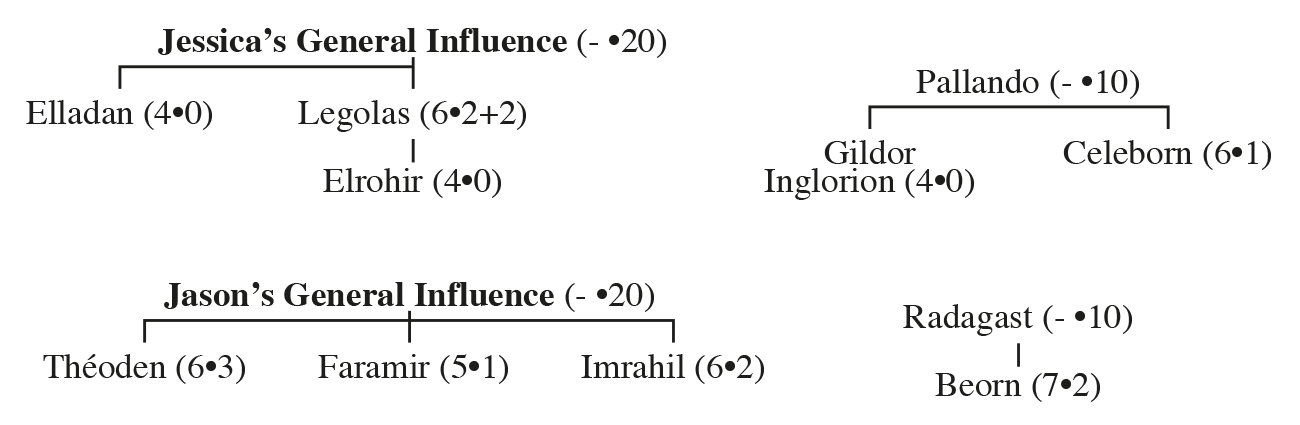
Example: (CPs = Corruption Points, MPs = Marshalling Points) Our two players Jessica and Jason have been playing for awhile and Jessica exhausts her play deck during her turn. Since she has 15 MPs and Jason only has 14, she decides to call the Free Council. Each player has one company in Lórien:
| Jessica Controls | CPs | MPs |
|---|---|---|
| Men of Lebennin (faction) | 0 | 2 |
| Dreams of Lore (information) | 0 | 2 |
| Pallando (controls): | Total CPs: 2 | 0 |
| Sword of Gondolin (item) | 2 | 2 |
| Gwaihir (ally) | 0 | 2 |
| Celeborn | 0 | 2 |
| Gildor Inglorion (controls): | Total CPs: 1 | 1 |
| Healing Herbs (item) | 1 | 0 |
| Legolas (controls): | Total CPs: 2 | 2 |
| Elfstone (item) | 1 | 0 |
| Dagger of Westernesse (item) | 1 | 0 |
| Elrohir | 0 | 1 |
| Elladan | Total CPs: 0 | 1 |
| Jason Controls | CPs | MPs |
|---|---|---|
| Radagast (controls): | Total CPs: 0 | 0 |
| Beorn (controls): | 0 | 2 |
| Quickbeam (ally) | 0 | 2 |
| Théoden (controls): | Total CPs: 4 | 2 |
| Sword of Gondolin (item) | 2 | 2 |
| Great Shield of Rohan (item) | 2 | 2 |
| Faramir (controls): | Total CPs: 2 | 2 |
| Dagger of Westernesse (item) | 1 | 0 |
| Healing Herbs (item) | 1 | 0 |
| Imrahil (controls): | Total CPs: 0 | 2 |
Since Jessica called the council, Jason gets one final turn before the council starts. Jason brings Éomer into play for one more MP, and then moves his company to Lake-town. After facing the hazards Jessica plays, he successfully plays the Men of Northern Rhovanion faction for two more MPs. Jason now has 17 MPs and will win the game if he does not lose any MPs due to characters failing corruption checks.
In this example, any character with 2 or more CPs could fail his corruption check (see Corruption). If Pallando fails his corruption check, the game ends immediately and Jason wins. If Legolas fails his corruption check, Jessica loses 2 of her MPs. If Théoden fails his corruption check, Jason loses 6 of his MPs. If Faramir fails his corruption check, Jason loses 2 of his MPs.
2 · THE CARDS AND DECKS
There are five types of cards: site cards, character cards (including Wizard cards), resource cards, hazard cards, and region cards (this last type is not used with the Starter Rules).
Site cards — have a white parchment background on the front.
Character cards — (non-Wizard) have a blue stone background on the front. Each Wizard card has a differently colored stone background.
Resource cards — have a copper metal background on the front.
Hazard cards — have a steel gray metal background on the front.
Region cards — have a labeled map on the front.
Site and region cards — (i.e., location cards) have an unlabeled map of northwestern Middle-earth on the back.
Character, resource, and hazard cards — have the burning eye on the back.
Clarification: For emphasis, a value used during play is often provided both in a card’s text and in another place on the same card. For example, a character’s corruption check modification is stated both in the text and the lower right corner of the character’s card.
Note: Each starter deck has a small pack of cards called a fixed set. There are 5 fixed sets in all. One appears randomly in each starter deck. The top facing card of all fixed sets is Gates of Morning.
A fixed set is included in each starter deck to make a starter deck playable without any other cards.
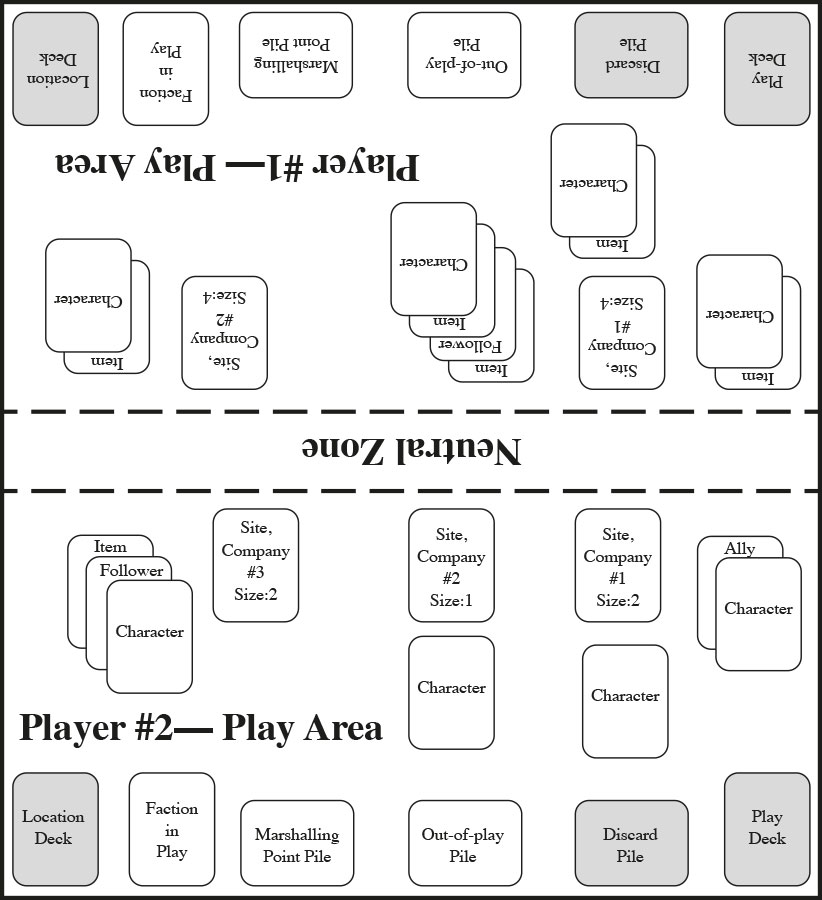
During play, your cards are organized into 2 decks and 3 piles:
Location Deck — This deck consists of your site cards. You may examine and select cards from your location deck as required by play (i.e., do not randomly draw them). After being played, your non-Haven site cards are sometimes discarded and placed in the discard pile (i.e., when one of your companies leaves a tapped site, it is discarded).
You can use resources at certain sites and under certain conditions. Resources include: items, factions, allies, events, etc. You may only play resource cards during your own turn. You use hazards to hinder and attack your opponent’s characters in order to prevent them from marshalling resources.You may only play hazard cards during your opponent’s movement/hazard phase.
Clarification: The card, Twilight, is an exception to this rule-it can be played at anytime, either as a resource or as a hazard (it does not count against the hazard limit). Certain other cards specifically state when they may be played.
Discard Pile — Your discarded cards are placed face down in your discard pile. When your play deck is exhausted, location cards in your discard pile are returned to your location deck. You shuffle the other cards in your discard pile and they become your new play deck.
Clarification: Your play deck is “exhausted” when you draw its last card. Some cards require that your play deck be manipulated and then reshuffled-this does not “exhaust” your play deck.
Out-of-play Pile — Your cards that are removed from play after being used are placed in your out-of-play pile.
Marshalling Point Pile (MP pile) — In addition to marshalling points from cards in play, you gain marshalling points when certain cards are removed from play. When you defeat all of the strikes from a creature, the creature’s card is placed in your MP pile. When you store certain resource cards (e.g., items, information cards, etc.), they are placed in your MP pile.
Note: Because hazard cards are distinct from resource cards, you may not play your hazards on your side of the playing surface. At the end of a game, it will be obvious whose cards are whose, i.e., hazards in your area must belong to your opponent. We suggest adopting a neutral zone between each player’s side of the playing surface. Non-targeted long-events and permanent-events can be played in this neutral zone.
Note: You may freely examine the contents of your discard pile; your opponent may not. The contents of your out-of-play and marshalling point piles may be freely examined by you and your opponent.
Clarification: Several types of cards are referred to by the key word included in the first few words of a card’s text. For example, the text of a “spell” card starts with spell; the text of a “Nazgûl” card starts with Unique. Nazgûl; the text of a “Palantír” starts with Unique. Palantír.
CARD COMBINATIONS
Often combinations of several cards and other actions are required to achieve a desired result. For example, to bring The One Ring into play requires: traveling to a site to play one of the Gold Ring cards, some sort of “Test” card or ability, The One Ring card, and a high die roll. In addition, the Wizard’s Test card and the Scroll of Isildur card will dramatically improve the chances of successfully getting The One Ring into play.
TAPPING AND CARD POSITIONS
Normally, during play, each of your cards is placed on the playing surface so that its top is towards your opponent and its bottom is towards you. During play certain cards must be “tapped” when they are used-this is a record keeping mechanism to keep track of card usage. To tap a card, rotate it 90° so that it is turned sideways-to untap a card, rotate it back 90° to its normal position.
When one of your characters is wounded, his card is placed with its top towards you (i.e., rotated 180° from an untapped position). All restrictions to tapped characters also apply to wounded characters.
Items and characters tap independently.
UNIQUE & “MAY NOT BE DUPLICATED” CARDS
If a card states that it is “unique” or that it “may not be duplicated,” only one such card (or its effects) may be in play at a time. The first card played takes precedence (influence checks may change this). This restriction applies to all cards in play, i.e., both yours and your opponent’s.
Only one of each “unique” card may be included in your play deck and starting cards combined. As an exception, two of the same Wizard may be included in your play deck (to give you a better chance of drawing one early).
3 · GETTING READY TO PLAY
Follow these steps to get ready to play:
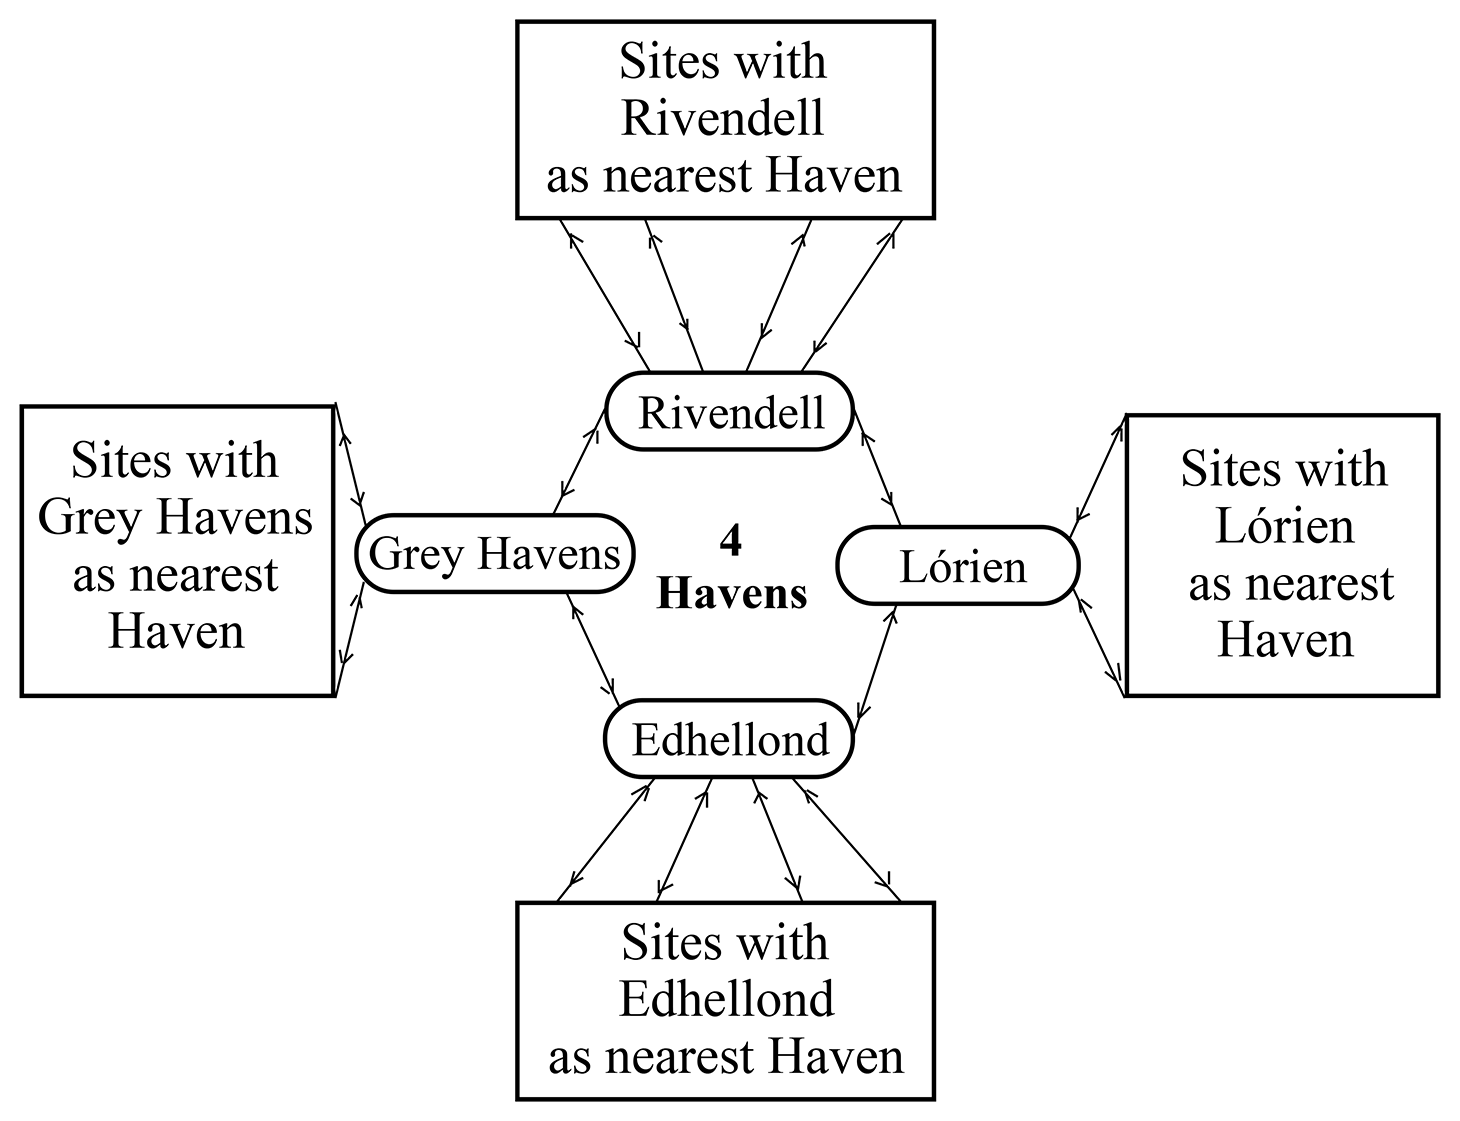
- Place your site cards in your location deck. This deck should contain all of your Haven cards (i.e., Rivendell, Edhellond, Grey Havens, and Lórien). You may include any number of Haven cards, but only one of each non-Haven site card.
- Place between 25 and 50 Resource cards and an equal number of Hazard cards in your play deck (if you have fewer than 25 of either available, just use all of the cards you have). Only one of each “unique” card may be included. No more than three copies of any one non-unique card may be included.
- Place one to five starting characters (no Wizards) face down in front of you. The combined mind attributes (see Character Attributes) of these characters must be 20 or less. You and your opponent reveal your characters simultaneously, placing any duplicated characters into your play decks. Then organize your starting characters into followers and companies and place them at Rivendell (i.e., place a Rivendell site card next to them).
- You may assign up to two non-unique minor items to your starting characters (i.e., two items total, not two to each character). These items must come from cards that you have not already committed to your play deck.
- Place up to 10 character cards in your play deck. Only one of each character card may be included. In addition, place up to two Wizard cards in your play deck (you may place two copies of the same Wizard). Shuffle your play deck.
- Draw a hand of eight cards from your play deck.
- Each player makes a roll, and the player with the highest result goes first (reroll if tied).
Clarification: None of your starting characters may be considered to be followers for the purposes of determining their combined mind attributes-your initial characters have to have combined mind attributes of 20 or below.
Clarification: The initial 1-5 characters and two minor items do count toward the “one-unique” and “three-others” limits on the play deck. However, they do not count towards the number of resource and character cards in your starting play deck.
4 · THE PLAYER TURN
Play consists of a series of “Player Turns.” During your turn, you take various actions during the following phases. Then, your opponent does the same during his turn.
- 1) Untap Phase
- 2) Organization Phase
- 3) Long-event Phase
- 4) Movement/Hazard Phase
- 5) Site Phase
- 6) End-of-Turn Phase
See detailed the Full Player Turn Summary.
Clarification: The actions that may be taken during your organization phase may be taken in any order. Actions of the same type do not have to be taken together (e.g., you can store an item, then bring a character into play, and then store a second item).
Clarification: If one of your companies doesn’t move, neither player draws cards based on that company’s movement. However, your opponent can play still play allowable hazards on that company (hazard limit still applies).
Clarification: Each player draws cards when each company moves and then discards or draws to 8 cards after the company has completed movement. Additionally, at the end of each turn, each player can discard one card and then discard or draw to 8 cards.
Clarification: During the site phase, a company may decide not to enter and explore its current site. In this case, the company does not face the automatic-attack, but it may not take any other actions or play any cards during the site phase. The company remains at the site and it may decide to enter and explore the site on a later turn.
Clarification: A site is tapped when one item, ally, faction, or information card is played. Non-Haven sites only untap after being discarded and after your play deck is exhausted. So, each time through your play deck, only one such card may normally be played at a given non-Haven site. Haven cards, whether tapped or not, always return to your location deck.
5 · CHARACTERS & COMPANIES
As a player, you influence and control a number of characters that move and act in the world of Middle-earth. Each character’s abilities are defined by these attributes: race, skills, direct influence, prowess (offense), body (defense), mind, marshalling points, and special abilities (e.g., corruption check modifiers). A character can be eliminated and removed from play as a result of combat (failing a body check) or corruption (failing a corruption check).
If you have enough general influence or direct influence during a given turn, you may bring into play: one character at his home site or at any Haven or your Wizard at his home site or Rivendell.
Characters are primarily controlled by your pool of 20 general influence points. For each controlled character, you must commit a number of general influence points equal to his mind attribute. In addition, you may control a character by using another character’s direct influence-a character controlled in this fashion is called a follower and does not use general influence points. (See an extended example.)
During play, you may organize your characters into groups called companies. A company’s size is equal to the number of characters in it, with each Hobbit character only counting half (round up). A company is limited to a size of seven. A company’s hazard limit is equal to two or the size of the company, whichever is greater. The maximum number of hazards that can be played on a company during a given movement/hazard phase is equal to its hazard limit.
Companies can only combine at a Haven — just remove all but one of the companies’ Haven site cards. The resulting company then has one site card consisting of one Haven site card.
One company can split into two or more companies only at a Haven (use two Haven cards).
Note: The number of characters you have in play limits the number of actions you may take during a given turn. You use your Wizard’s general influence or your other characters’ direct influence on a character to bring that character into play and to keep it in play. A character in play can move and take actions (e.g., defending against attacks, influencing, etc.). Items, allies, and other cards representing things a character acquires and controls are placed under his card.
CHARACTER ATTRIBUTES
Each character’s abilities are defined by the following attributes (the notation for certain attributes is given in brackets).
Race: This is one criterion for using certain resources and for bringing certain items, characters, and factions into play (e.g., only a Dwarf can fully utilize a Dwarven Ring). The races are: Elf, Hobbit, Dwarf, Dúnadan, Man, and Wizard.
Skills: This is one of the criterion for using certain cards (e.g., warrior skill is required to use certain weapons). The skills are: warrior, scout, ranger, sage, and diplomat. Some characters have more than one skill.
Direct Influence [![]() ]: A character’s direct influence determines how many of your characters he may control (i.e., have as followers). In addition, a character’s unused direct influence affects his chances of influencing factions and your opponent’s resources.
]: A character’s direct influence determines how many of your characters he may control (i.e., have as followers). In addition, a character’s unused direct influence affects his chances of influencing factions and your opponent’s resources.
Prowess [lower left, to left of “/”]: A character’s prowess is a measure of a character’s offensive capabilities in combat.
Body [lower left, to right of “/”]: A character’s body is a measure of how difficult it is to physically eliminate the character. This is a mixture of the ability to avoid an attack and the ability to absorb or deflect an attack (e.g., armor, shield, blocking).
Mind [![]() ]: A character’s mind determines how many influence points (a Wizard’s general influence points or a character’s direct influence points) are required to keep this character in play.
]: A character’s mind determines how many influence points (a Wizard’s general influence points or a character’s direct influence points) are required to keep this character in play.
Marshalling Points [ upper left ]: This is the number of marshalling points you receive when you have the character in play. This value represents the character’s importance to the Free Peoples’ struggle against Sauron.
Special Abilities: Some characters have special abilities that are detailed on their cards. Common special abilities include corruption check modifiers, influence bonuses, prowess bonuses. For example, Faramir has an influence bonus against the Rangers of Ithilien faction, Éowyn has a prowess bonus against Nazgûl, Frodo has a corruption check modifier, etc.
INFLUENCING (CONTROLLING) A CHARACTER
You have a pool of 20 general influence points. At any one time, the total mind attributes of your characters in play (not counting followers) must be less than or equal to 20; this total is equal to your used general influence points. Your unused general influence points help your characters resist the effects of certain cards (e.g., Call of Home, Call of the Sea, Muster Disperses, etc.).
Note: In the Standard Rules, your unused general influence points help your characters, factions, allies, and items resist influence attempts made by your opponent.
Direct Influence
Some characters have a direct influence attribute of one or more. If such a character’s direct influence is greater than or equal to another one of your characters’ mind attribute, he may take control of that other character, who then becomes a follower of the controlling character. These conditions must be met:
- The total mind attributes of all of a character’s followers may not exceed his direct influence.
- A character can take control of another character that is in play only if both characters are at the same site.
A follower does not require influence points from your general pool. The follower must remain stacked under the character exerting the direct influence at all times. A follower may not use his direct influence to control characters (i.e., a follower may not have his own followers).A follower is handled in all other ways as a normal character(e.g., counts for company size, takes normal actions , etc.).
If you have enough unused general influence points, you may move a follower from direct influence to general influence (or vice versa) during your organization phase.
If a character directly influencing a follower is removed from play, the follower remains in play and does not immediately count against general influence. However, during your next organization phase, you must discard the follower, place the follower under the control of another character in his company with enough available direct influence, or place the follower under the control of general influence (if enough is available).
Example: In this example and later examples, the notation “#·#” is used. The first number is the character’s mind attribute; the second is his direct influence (DI). You have nine characters you want to control: Gandalf (- ·10), Aragorn II (9·3), Boromir II (4·1), Legolas (6·2), Gimli (6·2), Frodo (5·1), Sam (4·0), Merry (4·1), and Pippin (4·1). In addition, Aragorn II has Narsil (+1 to direct influence), Frodo has The One Ring (+5 to direct influence), and Gandalf has a Lesser Ring (+2 to direct influence). In order for you to control and keep these characters in play, you must use all of your 20 points of general influence (GI) and their direct influence (DI).First, Gandalf does not require any influence-he’s your Wizard. You use your GI to control Frodo, Aragorn II, and Gimli. This uses all 20 points: 5 for Frodo, 9 for Aragorn II, and 6 for Gimli. Gandalf has 12 DI (his normal 10 plus 2 for the Lesser Ring), so he uses it to control Sam, Merry, and Pippin (they become his followers). Aragorn II has 4 DI (his 3 plus 1 for Narsil), so he uses it to control Boromir II. Frodo has 6 DI (his 1 plus 5 for The One Ring), so he uses it to control Legolas. The company size is 7 because Hobbits only count half. The resulting company organization is outlined below:

Jessica’s company size is 6 and she has 10 unused general influence; Jason’s company size is 5 and he has 3 unused general influence.
Clarification: During the organization phase, you can move characters from control by general influence to control by direct influence and vice versa so long as your total of mind attributes does not exceed your available influence at the end of the organization phase.
Clarification: If you do not have enough influence to control all of your characters in play, you must discard any excess characters at the end of your next organization phase.
BRINGING CHARACTERS INTO PLAY
During your organization phase, you may perform one and only one of the following activities:
- You may play a character card. You must have enough general influence or direct influence available to control the character. You must place him at his home site or at any Haven site.
- You may play a Wizard card if you do not have one in play. You must place a Wizard at his home site or at Rivendell. You need not control a Wizard with influence-he represents you, the player.
When you play a character, you may place him into a company already at his arrival site or he may become a new company (consisting of one character). In the second case, you must place the arrival site card next to the character played.
Clarification: If character is played at his home site or a Haven site and there is no company there, you must play the site card for his arrival site with him. If the appropriate site card is not available, you may not play the character.
Clarification: Playing a character does not tap a site.
Each character and Wizard is unique. So if you already have a character in play, your opponent may not play the same character. Similarly, if a character has been eliminated, he may not be brought into play again by either player.
Example: In our example from page 11, Jessica calls the Free Council. Then Jason gets to take his final turn. Since his company is at a Haven, Jason may play a character card from his hand during his organization phase. Jason has Éomer (with a 3 mind attribute) in his hand so he plays him. Jason has 3 points of unused general influence; he also has Théoden with 3 points of unused direct influence and Radagast with 3 points of unused direct influence. So Éomer may be placed under the control of general influence, Théoden, or Radagast (Jason’s choice).
REVEALING A WIZARD
Once you decide to reveal your Wizard, you may still use your pool of general influence points; but, in addition, your Wizard acts as a character (a very powerful one). While revealing your Wizard is an advantage, it also carries with it the danger of losing the game by losing your Wizard to death or corruption.
After being revealed, a Wizard operates as a character and thus may use his direct influence just like any other character.
COMPANIES
A company is a group of characters that move and act together. This allows characters to move, act, and defend as a unit, allowing stronger characters to protect the weaker characters. This mechanism can be used to allow a variety of tactics during play.
For example, if you have 3 characters in play, the 3 characters can move separately and perhaps do more in terms of acquiring marshalling points (items, other characters, etc.); but each individual character is more vulnerable to danger. However, the same 3 characters operating as a company might acquire marshalling points more slowly, but they are safer (i.e., you risk less).
Normally, a company is limited to a size of seven, but a company at a Haven site may be of any size. For these purposes, a Wizard counts as a character, but an ally does not. The size of a company is determined for each company at the beginning of the movement/hazard phase (e.g., it remains fixed even if a character leaves the company).
HEALING
Each of your characters at a Haven may heal during the untap phase of your turn. Such a character moves from a wounded position to a tapped position (i.e., the character is still tapped). In addition, certain cards can heal characters when they are played (e.g., Healing Herbs, Halfling Strength, etc.).
6 · MOVEMENT
In METW the lands of northwest Middle-earth are represented by regions. The site cards represent places that companies can visit within those regions. Except for a moving company during its movement/hazard phase, each company always has a current site card associated with it-the company is located at that site.
Clarification: The specific region cards are not used with the Starter Rules. Remove these cards from your location deck if you are not using the Standard Rules. Region cards are not included in starter decks.
Note: Site paths do not direct the movement process. The site path is used to determine which hazard creatures your opponent may play against your moving company.
Note: By using the site cards and site cards only, a company can move from any site to any other site. First, if necessary, the company moves to the nearest Haven. Then, if necessary, it moves to another Haven. Finally, it moves from that Haven to the destination site.
A company commits to moving by playing a new site card (face down) during its organization phase. A company does not have to move during a given turn (i.e., it does not play a new site card).
At the beginning of its movement/hazard phase, a moving company current site card becomes its site of origin-the company is considered to be en route to its new site card (i.e., the company is moving).
At the end of a moving company’s movement/hazard phase (before players return to their hand sizes), its site of origin is removed (discard if tapped; otherwise, return it to your location deck) and the new site card becomes the company’s current site card.
Clarification: Some cards can interrupt this process by forcing a company to return to its site of origin.
Moving From a Non-Haven Site
If the company’s site of origin is a non-Haven site, the new site card must be the Haven listed as the nearest Haven on the site of origin card (i.e., the company can move back to its nearest Haven).
Moving From a Haven Site
If the company’s site of origin is a Haven, the new site card must meet one of the following requirements:
- If the new site card is not another Haven, it must list the site of origin as its nearest Haven (i.e., the company can move to any site that has the site of origin as the company’s nearest Haven).
- If the new site card is another Haven, it must give a site path to the site of origin (i.e., the company can move to one of two adjacent Havens; each Haven is adjacent to two other Havens).
Clarification: If a company is not moving, no cards are drawn. If a company is moving to a non-haven site, you may draw up to the # of cards indicated by the site that it is moving to (at least one card must be drawn); your opponent does the same. If a company is moving to a haven site, you may draw up to the # of cards indicated by the site that it is moving from (at least one card must be draw); your opponent does the same.
- Except for a moving company during its movement/hazard phase, each company is always at a specific site, called its current site.
- A company wanting to move to a new site plays a new site card face down beside its current site card by the end of its organization phase. A company can only move: from a non-Haven site to its “Nearest Haven,” from a Haven site to one of its two “adjacent Havens,” or from a Haven site to a non-Haven site that lists that Haven as its “Nearest Haven.”
- At the beginning of its movement/hazard phase, a moving company’s new site card is revealed and its current site card becomes its site of origin.
- At the end of its movement/hazard phase, the site of origin is removed and the moving company’s new site card becomes the company’s current site card.
Suggestion: To help decide where a company should move, look at the resource cards in your hand. Then decide to which of your available sites to move. For example, if you have a major item, go to a site where a major item can be played.
Example: Jessica’s company is in Bree (i.e., its current site) and wants to go to Thranduil’s Halls to try and bring the Wood-elves faction into play. Bree’s nearest Haven is Rivendell, while Thranduil’s Halls nearest Haven is Lórien.
First, it takes one turn to move from Bree to Rivendell using the site path, ![]()
![]() , indicated on the Bree site card. Jessica just plays the Rivendell site card as her new site card during her organization phase, and she removes the Bree site card at the end of her movement/hazard phase.
, indicated on the Bree site card. Jessica just plays the Rivendell site card as her new site card during her organization phase, and she removes the Bree site card at the end of her movement/hazard phase.
During the next turn, the company may move from Rivendell to Lórien using the site path, ![]()
![]()
![]()
![]() , indicated on both the Rivendell and Lórien site cards. Jessica plays the Lórien site card during her organization phase, and she removes the Rivendell site card at the end of her movement/hazard phase.
, indicated on both the Rivendell and Lórien site cards. Jessica plays the Lórien site card during her organization phase, and she removes the Rivendell site card at the end of her movement/hazard phase.
Finally, the company takes one turn to move from Lórien to Thranduil’s Halls using the site path, ![]()
![]()
![]() , indicated on the Thranduil’s Halls site card. Jessica plays the Thranduil’s Halls site card during her organization phase, and she removes the Lórien site card at the end of her movement/hazard phase.
, indicated on the Thranduil’s Halls site card. Jessica plays the Thranduil’s Halls site card during her organization phase, and she removes the Lórien site card at the end of her movement/hazard phase.
SITE PATHS
There are six types of regions and six types of sites:
| Region Type | Symbol |
|---|---|
| Coastal Seas | [ |
| Free-domains | [ |
| Border-lands | [ |
| Wilderness | [ |
| Shadow-lands | [ |
| Dark-domains | [ |
| Site Type | Symbol |
|---|---|
| Havens | [ |
| Free-holds | [ |
| Border-holds | [ |
| Ruins & Lairs | [ |
| Shadow-holds | [ |
| Dark-holds | [ |
A site path is the sequence of regions between a site and its nearest Haven. However, each region in the sequence is only indicated by its type, not by its name. Each non-Haven site card has a site path on it. Each Haven site card has two site paths, but each of those two paths gives the sequence of regions between the Haven and one of the two Havens nearest to it.
Note: Site paths do not direct the movement process. The site path is used to determine which hazard creatures your opponent may play against your moving company.
Clarification: A “company’s site path” during its movement /hazard phase is the site path between its site of origin and its new site. On non-Haven site cards, the site path is provided on the top left border. On Haven cards, the site path to each of the two adjacent Havens is provided in the card text.
Example: In the Example of movement from Bree to Thranduil’s Halls on page 26, the first site path used was from Bree to Rivendell: ![]()
![]() . During that movement/hazard phase, Jason (Jessica’s opponent) can play hazard creatures keyed to wilderness (
. During that movement/hazard phase, Jason (Jessica’s opponent) can play hazard creatures keyed to wilderness (![]() ), double wilderness (
), double wilderness (![]()
![]() ), and Havens (
), and Havens (![]() the new site).
the new site).
During the next turn, the company uses the site path from Rivendell to Lórien: ![]()
![]()
![]()
![]() . During that movement/hazard phase, Jason can play hazard creatures keyed to wilderness (
. During that movement/hazard phase, Jason can play hazard creatures keyed to wilderness (![]() ), double wilderness (
), double wilderness (![]()
![]() ), border-lands (
), border-lands (![]() ), and Havens (
), and Havens (![]() the new site).
the new site).
Finally, the company takes one turn to move from Lórien to Thranduil’s Halls using the site path, ![]()
![]()
![]() . Jason can play hazard creatures keyed to wilderness (
. Jason can play hazard creatures keyed to wilderness (![]() ), border-lands (
), border-lands (![]() ), and free-holds (
), and free-holds (![]() the new site).
the new site).
Region Types
- Coastal Seas [
 ]: Regions consisting primarily of open water.
 - Free-domains [
 ]: Very safe, civilized regions (e.g., Lindon, The Shire, Belfalas, Anórien, etc.).
 - Border-lands [
 ]: Less civilized regions on the border of the wilderness or shadow territory (e.g., Rohan, Lamedon, etc.).
 - Wilderness [
 ]: Sparsely populated, uncivilized regions that cover most of NW Middle-earth (e.g., High Pass, Enedhwaith, Rhudaur, etc.).
 - Shadow-lands [
 ]: Regions with some active Shadow-forces and settlements (Imlad Morgul, Dagorlad, etc.).
 - Dark-domains [
 ]: Regions with a heavy concentration of Shadow-forces (Southern Mirkwood, Gorgoroth, etc.).
Site Types
- Havens [
 ]: Very safe sites of rest and healing (e.g., Rivendell, Grey Havens, Edhellond, and Lórien).
 - Free-holds [
 ]: Sites of safety, but still dangerous due to assassins, traitors, etc. (e.g., Minas Tirith, Edoras, etc.).
 - Border-holds [
 ]: Sites of relative safety, but still dangerous due to bandits, assassins, traitors, etc. (e.g., Bree, Lake-town, etc.).
 - Ruins & Lairs [
 ]: Deserted sites often inhabited by dangerous creatures (e.g., the Lonely Mountain, Barrow-downs, etc.).
 - Shadow-holds [
 ]: Relatively deserted sites often inhabited by dangerous creatures and Shadow-forces (e.g., Goblin-gate, Mount Gram, etc.).
 - Dark-holds [
 ]: Very dangerous sites with heavy concentrations of Shadow-forces (Dol Guldur, Barad-dûr, etc.).
7 · COMBAT
Combat normally occurs when one of three things happen:
- When a creature hazard is played on a company.
- When a company at a site with an automatic-attack decides to attempt to play a resource card for that site (i.e., decides to attempt to enter and explore the site).
- When any other card indicates that a company must face an attack.
ATTACKS & STRIKES
Combat consists of one or more attacks that must be resolved one at a time. An attack consists of one or more strikes:
- Each strike can target one and only one character in the attacked company.
- Each character can be the target of only one strike from a given attack.
- If an attack has more strikes than the company has characters, the attacker may allocate the excess strikes as -1 modifications (i.e., a -1 modification for each unallocated strike) to the prowess(es) of whichever target(s) he chooses. See the Strike Sequence.
Unless the attack states otherwise, the defender chooses which untapped characters will be the targets of given strikes. Then, the attacker chooses which other defending characters not yet assigned a strike will be the target of any remaining unassigned strikes.
Clarification: Against a given attack, a character may only defend against one strike.
Clarification: If the text on a creature card states that the “attacker chooses defending characters,” any characters in the defending company may be chosen (by the attacker) as the targets of the attack’s strikes.
Clarification: All of an attack’s strikes must be assigned to the characters in the defending company or as modifications to the strikes assigned. The attacker may not choose to not apply strikes. Any strike in excess of the number of characters in the company becomes a -1 modification to prowess of one character taking a strike (the attacker chooses). Only those strikes that are assigned need be defeated for the creature’s marshalling points to be received by the defender.
Strike Modifications
There are a number of standard modifications to strikes:
- Each unwounded, tapped character must modify his prowess by -1.
- Each wounded character must modify his prowess by -2.
- Normally a character that is the target of a strike is tapped after the strike is resolved. However, a character that is the target of a strike may choose to take a -3 modification to his prowess to avoid being tapped. If so, the character is not tapped after the strike is resolved (he may still be wounded).
- If an attack has more strikes than the company has characters, the attacker may allocate the excess strikes as -1 modifications to the prowesses of whichever target(s) he chooses. See the Strike Sequence.
- The target’s prowess may also be modified due to the play of certain resource and hazard cards. Only one resource card requiring skill may be played against a given strike.
Condition Mod. to Target’s Prowess Unwounded, tapped character * -1 Wounded character * -2 Untapped character decides not to tap * -3 For each unused strike allocated (i.e., each extra strike) * -1 Up to one resource card that requires skill varies Other resource cards varies Hazard cards varies
Clarification: The prowess modifications marked with an * above are applied for a given attack and then are removed immediately after the attack is resolved. That is they do not carry over from attack to attack.
Resolving Strikes
Strikes are resolved one at a time as decided by the defending player. When you choose a strike to resolve, determine all of the factors affecting the strike before the roll is made (see the Strike Sequence below).
To resolve a strike, the defender makes a roll (2D6) and adds his modified prowess:
- If this result is greater than the strike’s prowess, the strike fails. Such a strike is defeated if its body attribute is “p;” or if it has a body attribute and fails a body check.
- If this result is equal to the strike’s prowess, the strike was ineffectual (i.e., a “tie” means that the strike is avoided but not defeated).
- Otherwise, the strike was successful (i.e., the character was defeated). The target character is wounded and must make a body check.
BODY CHECKS
If a strike against a character is successful, the character is wounded and must make a body check. To make a body check, the attacker makes a roll (2D6); if this value is greater than the character’s body attribute, the character is eliminated. If the character was already wounded before this strike, the roll is modified by +1.
Clarification: If a character was already wounded before a strike wounds him again, the resulting body check modification is always +1 (regardless of how many times a character is wounded).
Clarification: If a strike against a character is successful, a body check must be resolved for the character before anything else happens. For example, Healing Herbs may not be used to heal such a character until after the body check is resolved (of course, if the character is eliminated, the Healing Herbs may not be used on him at all).
As presented above, a strike that fails is defeated if its body attribute is “p;” or if it has a body attribute and fails a body check. To make such a body check, the defender makes a roll (2D6); if this value is greater than the strike’s body attribute, the strike is defeated.
Example: Smaug has a prowess of 17 and a body of 8. He normally has two strikes when he attacks. If one of his strikes against a character fails, the defender makes a body check. If the resulting roll is greater than 8, that strike is defeated. However, both of Smaug’s strikes must be defeated in order for him to be eliminated — this would require at least two body check rolls greater than 8.
DEFEATING AN ATTACK
An attack by a hazard creature is defeated if all of its strikes directed against (i.e., assigned to) a company are defeated. If a defeated attack is a hazard creature, the card is placed in the defender’s marshalling point pile. The defender receives marshalling points for eliminating it.
If a hazard creature has multiple attacks, each must be defeated in order for the defender to receive the marshalling points.
If one of the strikes was canceled or ineffectual, the attack is not defeated. If the attack is canceled, the attack is not defeated. A canceled attack has no effect on the defending company.
If Faramir rolls a 5 (i.e., his prowess plus the roll is equal to the Huorn’s prowess of 10), the strike is ineffectual.
If Faramir rolls a 4 or less (i.e., his prowess plus the roll is less than the Huorn’s prowess of 10), the strike was successful. Faramir is wounded and must make a body check. The attacker makes a die roll-if the result is 9 or more, Faramir is eliminated and removed from play.
THE STRIKE SEQUENCE
You and your opponent must play any cards that modify the number of strikes before you assign the strikes.
The “strike sequence” is the time from when a player declares that one of his characters will resolve a strike until the strike die roll is made and any associated body checks are made.
Strikes are resolved one at a time as decided by the defending player (i.e., he chooses a strike to resolve, the strike is resolved, he chooses the next strike to resolve, the strike is resolved, etc.).
All of the factors affecting the strike must be decided before making the roll (2D6). Address these factors in the following order:
- The attacker may play hazard cards that affect the strike (these count toward the hazard limit against this company).
- The attacker may decide to use any or all of his remaining (if any) -1 modifications due to unallocated strikes (i.e., strikes in excess of the company’s size).
- A target untapped character may take a -3 modification so that he will not automatically tap.
- The defending player may play resource cards that affect the strike (up to one card that requires skill).
Clarification: Certain attacks state that each character in the company “faces one strike” or “is attacked” (e.g., Crebain, Watcher in the Water, etc.). Such an attack is never affected by a card or effect that modifies the number of strikes of an attack.
Example of Combat [(#/#) means (prowess/body)]
You control Bilbo (1/9), Balin (4/7) and his follower Bofur (4/7) (with Healing Herbs), Beretar (5/8), and Beregond (4/8) (with an Elven Cloak). They are en route from Rivendell to Lórien. There are 4.5 characters in the company which rounds up to 5, meaning the hazard limit is 5.
Your opponent plays Orc-raiders. He keys this hazard creature to the border-land of your company’s site path because he is mindful of Beregond’s Elven Cloak (a minor item that cancels a strike keyed to wilderness). Bilbo, a scout, taps and plays Concealment to cancel the attack. Orc-raiders is discarded. That’s 1 hazard down and potentially 4 to go.
Your opponent next plays Orc-warband (second hazard) and states it is keyed to the border-land. It’s a (4/-) hazard creature with 5 strikes that receives +3 to prowess against a company that has faced an Orc attack. Even though Bilbo canceled the Orc-raiders, the company is still considered to have faced them, so the Orc-warband will be (7/-). There are 5 strikes and 5 characters, so each character will face one strike (no decisions on strike allocation can be made). Bilbo elects to face his strike first. His opponent plays Weariness of the Heart (third hazard) on Bilbo to give -1 to his prowess. This modification to his prowess is in addition to the -1 Bilbo suffers for being tapped. No other effects are played to affect the strike and Bilbo rolls the dice. The result is a 5. Bilbo’s prowess of -1 plus the dice roll is less than the prowess of the Orc-warband’s strike against Bilbo, so Bilbo is wounded. Your opponent rolls the body check. It’s a 7-Bilbo lives!
Beregond faces the next strike. Beregond taps and rolls a 10, defeating his strike handily. Bofur chooses to face his strike next. He a special +1 prowess bonus versus Orcs, and he chooses not to tap (-3 to his prowess). He rolls a 5 which ties the prowess of the Orc-warband strike. The strike is ineffectual.
Facing the next strike, Balin taps, and rolls a 7 to defeat it. Beretar resolves the final strike, taps, and defeats it by rolling a 3. Orc-warband is discarded.
Your opponent sees that one character, Bofur, is untapped. He plays Giant (13/-) (a fourth hazard) and reasons that Bofur will have to take its one vicious strike. (After all, if you give up the option of assigning the one strike to your untapped character, namely Bofur, the opponent will be able to choose from all 5 characters which will take the strike). Your opponent does not see what Bofur sees. Before assigning the strike, Bofur taps and uses his Healing Herbs to untap Beregond, who then announces he is taking the strike. The Giant is keyed solely to double wilderness, so Beregond taps his Elven Cloak to cancel its single strike. The Giant is discarded.
The opponent announces he will play no more hazards and the company breathes a sigh of relief. Bilbo will be able to heal at the start of the next turn since his company will be in Lórien, a Haven.
8 · CORRUPTION
As characters adventure in Middle-earth, they are subject to temptations. They run the risk of becoming corrupted and leaving the cause of the Free Peoples (i.e., a corrupted character leaves play, a corrupted Wizard loses the game). In The Lord of the Rings, Saruman was corrupted by power, Radagast was corrupted by the lure of nature, Alatar and Pallando succumbed to unknown corruption and disappeared into the East.
Each character has a corruption point total. This starts at zero, but certain cards and activities will increase and decrease this total during play. Most cards that affect a character’s corruption are kept under the character’s card until they are discarded. Only one corruption card (a hazard card that gives corruption points) may be played on a given character each turn.
Certain corruption cards state: “Cannot be duplicated on a given character.” So, a given character may only have one of each such corruption card.
CORRUPTION POINTS
A character’s corruption point total can be determined at any time by summing the corruption point values of: the corruption cards under his card and any other cards he controls (e.g., usually items).
CORRUPTION CHECKS
When a card or other effect indicates that one of your characters must make a corruption check, you must make a roll (2D6) and add any appropriate modifications. One of the following results:
- Nothing Happens — If the modified result is greater than the character’s corruption point total, nothing happens.
- The Character is Discarded — If the modified result is equal to the character’s corruption point total or one less than the character’s corruption point total, the character fails the corruption check and you must discard the character along with any non-follower cards he controls. In this case, if the character is a Wizard, you immediately lose the game.
- The Character is Eliminated — If the modified result is less than character’s corruption point total by two or more, the character fails the corruption check and is eliminated (i.e., remove him from play) and you must discard any non-follower cards he controls. In this case, if the character is a Wizard, you immediately lose the game.
Clarification: A character discarded due to a corruption check is not removed from play. He may be played again either by you (e.g., if you exhaust your play deck and draw that character) or by your opponent (e.g., if he has that character in his hand). In this case, the character stops working for the cause of the Free Peoples (at least for a while)-much as Radagast was corrupted by the physical nature of Middle-earth (i.e., he went “native”).
Clarification: A character eliminated due to a corruption check is removed from play. He may not be played again by either you or by your opponent. In this case, the character is permanently lost to the Free Peoples-much as Saruman was corrupted in The Lord of the Rings.
CORRUPTION CHECK MODIFIERS
Certain characters receive modifications to corruption checks, and certain cards may give modifications to a corruption check. Modifications to corruption checks are printed in the lower right of the appropriate card. A plus or a minus sign indicates a modification to any corruption checks rather than corruption points.
- Corruption check modifications always have either a plus (+) sign or a minus (-) sign (e.g., as noted on many character cards). The sum of all such applicable modifications are added to the corruption check roll.
- Corruption point values never have a plus or minus sign. The sum of all such values is the character’s corruption point total for the purposes of a corruption check.
Both values appear in the lower right of certain cards.
When Tom Bombadil rescues Frodo and company in the Barrow Downs, Frodo receives a Dagger of Westernesse (1 CP). So Frodo’s CP total becomes 7. He would be discarded if he makes a corruption check roll of 2 or 3 (if there are no other modifications).
On the way to Rivendell, Frodo is wounded by a Morgul-knife (4 CPs)-his CP total is now 11. If forced to make a corruption check, he is discarded on a roll of 6 or 7 and he is eliminated on a roll of 5 or less.
Finally, he reaches Rivendell and the Morgul-knife card is removed, dropping his CP total back to 7. However, he is then affected by Lure of the Senses (a hazard card giving 2 CPs and requiring a corruption check each untap phase at a Haven). So during his next untap phase, he must make a corruption check with a CP total of 9-he is discarded on a roll of 4 or 5 and is eliminated on a roll of 2 or 3.
Next, Frodo gets rid of the Lure of the Senses (by rolling greater than 6) and he transfers his Dagger of Westernesse. In addition, Bilbo gives him: Sting (1 CP) and The Mithril-coat (2 CPs). So Frodo’s CP total is 9 (6+1+2). If forced to make a corruption check, he is discarded on a roll of 4 or 5 and is eliminated on a roll of 2 or 3.
Fortunately, the Fellowship of the Ring is formed (see the company in the example)-we will assume that two Fellowship cards (+1 to prowess and corruption checks for all characters in the company) are played initially.
So Frodo leaves Rivendell with a CP total of 9 and corruption check modifiers totaling +6 (+4 normal +2 for Fellowship). Thus, if forced to make a corruption check (without other modifications), he will be discarded on a roll of 2 or 3.
9 · INFLUENCE
You have a pool of general influence. Your characters and Wizard have direct influence. These two forms of influence can control and affect characters (see Characters & Companies) and factions.
Your unused general influence is equal to 20 minus the sum of the mind attributes of your non-follower characters in play (i.e., do not count your followers).
A character’s unused direct influence is equal to his direct influence attribute minus the sum of the mind attributes of his followers. All characters have a direct influence attribute of at least zero, so any character has unused direct influence of at least zero.
Note: In the Standard Game, direct influence can be used to attempt to interfere with your opponent’s control of his characters, followers, factions, allies, and items (see Influence).
BRINGING AN ALLY INTO PLAY
You can automatically bring an ally into play by tapping one of your characters. The character must be at the site indicated on the ally’s card. Every ally is controlled by the character that tapped to bring it into play; i.e., it must be placed under and remain with that character’s card. An ally does not count against its controlling character’s direct influence or your general influence.
BRINGING A FACTION INTO PLAY
In order to play a faction card, you must tap one of your characters that is at the “site” indicated on the faction’s card. Then you must make an influence check. Make a roll (2D6), add your character’s unused direct influence, and add any appropriate modifications (any applicable standard modifications from the faction card and from any other cards played). All modification cards must be played before making the roll (2D6).
If the modified result is greater than the value required on the faction card, you place the faction in your play area (it now counts towards your marshalling point total). Otherwise, you discard the faction card. Once a faction is brought into play, it is not controlled by any specific character and it does not count against general or direct influence.
Clarification: Most faction cards list some “standard modifications” to the influence check based only upon the race of the character that was tapped to make the influence check. Similarly, certain characters have special modifications to influence checks. Such a modification only applies if it belongs to the character that was tapped to make the influence check.
Example: Suppose, during your site phase, you have the Knights of Dol Amroth in your hand and a company at Dol Amroth-the company contains Imrahil. He has no followers, so his unused direct influence is 2. You tap Imrahil to attempt to bring the Knights into play.
You make your influence check roll (2D6), and the result is 5. This roll is modified by:
- Imrahil’s unused direct influence: +2.
- +2 – Imrahil has a special ability: his direct influence is increased by +2 against the Knights of Dol Amroth.
- A standard modification of +1, because Imrahil is a Dúnadan and a standard modification of +1 is listed on the Knights of Dol Amroth card.
So the modified result is 10 (=5+2+2+1). Since this is greater than 8 (the number required by the faction card), the Knights of Dol Amroth are successfully brought into play.
If you had rolled a 3, your modified result would have been 8 (=3+2+2+1), and you would have had to discard the faction card.
10 · PLAYING AND DRAWING CARDS
You may only play hazard cards during your opponent’s movement/hazard phase. Except for resource long-events, you may play resource cards anytime during your own turn unless specifically prohibited by the rules or the cards themselves.
Unless stated otherwise, a card is playable only if its effect applies to an existing situation, hazard, attack, etc. (i.e., you may not play a card just to discard it).
Clarification: An automatic-attack at a company’s new site may be targeted by a hazard during the company’s movement/hazard phase (e.g., Arouse Minions, Dragon’s Desolation, etc.). Playing such a hazard does count against the hazard limit. Such a hazard may be played even if the attack ultimately will not be faced (i.e., if the company decides not to face the automatic-attack during the site phase).
During your movement/hazard phase, both players draw cards when each company moves. If a company moves to a non-Haven site, you may draw up to the number of cards indicated by the site that it moved to (at least one card must be drawn); your opponent does the same. If the company moves to a Haven site, you may draw up to the number of cards indicated by the site that you moved from (at least one card must be drawn); your opponent does the same.
EVENTS
There are both resource events and hazard events. Each event falls into one of three classifications based upon how long it stays in play.
Short-event — A short-event’s effects are immediately implemented. Then the event card is discarded. The effects of some short-events last for a specific period as stated on its card (e.g., many short-event effects last “until the end of the turn”).
Permanent-event — The effects of a resource permanent-event are immediately implemented. Its effects last until the card is discarded. Certain effects can cause a permanent-event to be discarded; these effects are given in the text of specific cards.
Clarification: Hazard short-events and permanent-events can be played only during an opponent’s movement/hazard phase. Resource short-events and permanent-events can be played at any time during your turn-as limited by specific card text.
You may only play a hazard long-event during your opponent’s movement/hazard phase. Its card and effects remain in play until your opponent’s next long-event phase or until otherwise discarded.
Clarification: The effects of many long-events and permanent-events affect both players because they can remain in effect during both players’ turns. So remember, when you play a long-event hazard on your opponent during his turn, it will remain in effect during your next turn. For example, Awaken Denizens (a long-event) increases the number of automatic-attack strikes at Ruins & Lairs for one turn for each player.
Example: One of Jason’s companies with a hazard limit of six is moving from Rivendell to Lórien; its site path is ![]()
![]()
![]()
![]() . Jessica plays Doors of Night (a permanent-event) during Jason’s movement/hazard phase. This causes all resource environment cards in play to be discarded and their effects are canceled. This card will remain in play until it is discarded due to the play of a Gates of Morning, Twilight, or another card that targets the Doors of Night.
. Jessica plays Doors of Night (a permanent-event) during Jason’s movement/hazard phase. This causes all resource environment cards in play to be discarded and their effects are canceled. This card will remain in play until it is discarded due to the play of a Gates of Morning, Twilight, or another card that targets the Doors of Night.
Jessica then plays Choking Shadows (a short-event). She decides to use its option of treating one wilderness [![]() ] as a shadow-land [
] as a shadow-land [![]() ] until the end of the turn. This changes the site path for Jason’s company from
] until the end of the turn. This changes the site path for Jason’s company from ![]()
![]()
![]()
![]() to:
to: ![]()
![]()
![]()
![]() . Choking Shadows is discarded, but its effects will remain until the end of the turn (unless canceled before that).
. Choking Shadows is discarded, but its effects will remain until the end of the turn (unless canceled before that).
Then, Jessica next plays Morgul Night (a long-event)-all wildernesses [![]() ] to be treated as shadow-lands [
] to be treated as shadow-lands [![]() ] and all shadow-lands [
] and all shadow-lands [![]() ] to be treated as dark-domains [
] to be treated as dark-domains [![]() ]. This changes the site path for Jason’s company from
]. This changes the site path for Jason’s company from ![]()
![]()
![]()
![]() to:
to: ![]()
![]()
![]()
![]() . Jessica can still play three more hazards and she can key them to border-lands, shadow-lands, and/or dark-domains. Unless its discard is forced by another card, Morgul Night and its effects will remain in play until Jessica’s next long-event phase (approximately two turns).
. Jessica can still play three more hazards and she can key them to border-lands, shadow-lands, and/or dark-domains. Unless its discard is forced by another card, Morgul Night and its effects will remain in play until Jessica’s next long-event phase (approximately two turns).
RESOURCE CARDS
Certain resource cards may only be played if specific required conditions exist.
Clarification: Playing a faction card, ally card, information card, or item card (unless stated otherwise on the card) requires an untapped character and an untapped site. In addition, the company must face any automatic-attacks located at the same site before such a card can be played. Playing another type of resource card does not neccessarily require an untapped site. This process may vary based upon specific card text.
Factions
If one of your characters is at the site specified on a faction card, he may tap to attempt to play the faction card. If the character successfully influences the faction as indicated on the faction’s card (see Bringing a Faction Into Play), the faction card is placed in your play area. After a faction is successfully played at a site, the site card is tapped.
Clarification: Once a faction is brought into play, it is not associated with any character. A faction plays no active role after it is brought into play.
Allies
A character may tap to play an ally card if he is at the site specified on the ally card and the character meets the requirements indicated on the ally card. The ally card is placed under the character’s card and that character controls the ally. After an ally is played at a site, the site card is tapped. An ally does not count as a character for any purposes other than combat and the use of certain skills. Allies can not bear items.
An ally with a skill may take actions and play cards that require that skill. For example, Treebeard has the sage skill, so he can tap to play a Dreams of Lore card. Similarly, Gollum has the scout skill so he can tap to play a Concealment card.
Clarification: Allies that are eliminated are placed in the out-of-play pile (i.e., neither player may bring that ally back into play). Allies are not affected by corruption.
Items
If a character is at an untapped site that indicates that a specific type of item card (gold ring, minor, major, or greater) is “playable,” he may tap to bring an item of that type into play. The item card is placed under the character’s card. After an item is played at a site, the site card is tapped.
A character may only use the effects of one weapon at a time and one shield at a time and one armor at a time.
If a character is eliminated by corruption, discard all of the items that he controls. If a character is eliminated due to failing a body check, one item can be immediately transferred to each unwounded character in his company; but, the rest of his items are discarded.
Clarification: An item only taps when used if its text states so. Thus, weapons and armor do not normally tap when used.
Clarification: A character may control (i.e., bear) any item, even if he cannot use its abilities.
Clarification: A character may control (i.e., bear) more than one weapon or more than one shield or more than one armor. However, only one of each type may be used at any given time.
Minor Items
If a resource card that taps a site (e.g., ally, faction, item, information, etc.) is successfully played at a site, one additional character may tap to play a minor item. Such a minor item may be played even if the site does not specifically state that a minor item is playable at the site. For example, a minor item played when bringing an ally into play would simulate a gift from the ally.
Example: Certain card combinations are required to bring certain powerful items into play. Narsil was a mighty sword that was broken when Elendil fell fighting Sauron. Narsil can be played and used as a greater item (+1 direct influence, +1 prowess, 3 MPs, 2 CPs). However, a player can attempt to reforge Narsil so that it becomes Andúril, the Flame of the West (Aragorn II’s weapon in The Lord of the Rings).
Two other cards are required. A Reforging card must be played at an “information site” and stored at a Haven-this represents gathering the resources required to reforge Narsil. Then, the Andúril card must be played at an “information site” and stored at a Haven-this represents gaining the knowledge of how to reforge Narsil.
Then, the Reforging card is discarded and the Andúril card is placed with the Narsil card-giving a total of (+2 direct influence, +5 prowess, 7 MPs, 3 CPs) from the combination of the two cards.
THE HAZARD LIMIT
During your opponent’s movement/hazard phase, the number of hazard cards that you may play on one of your opponent’s companies is that company’s hazard limit. The hazard limit is equal to two or the company’s size, whichever is greater. A company’s size is equal to the number of characters in it, with each Hobbit counting half (round up). For this purpose, Wizards and followers do count as characters, but allies do not.
A hazard limit can be modified by the play of certain cards. Tapping a Nazgûl permanent-event does count against the hazard limit.
Clarification: For the purposes of calculating hazard limits, each company’s size is determined for each company at the beginning of the movement/hazard phase (e.g., it remains fixed). So, if a character is eliminated during his company’s portion of the movement/hazard phase, his company’s hazard limit does not change.
HAZARD CARDS
Hazard cards represent evil forces and natural dangers in Middle-earth. You may play hazard cards only during your opponent’s movement/hazard phase.
Creature Cards
You may use a creature card to directly attack one of your opponent’s companies. Such an attack can occur only if:
- The company is at a specific site at which the creature’s card text says it can be played.
- The company’s site of origin or new site is in a region where the creature’s card text says it can be played.
- One of the site symbols on the creature’s card matches the site that the company moved to (i.e., the new site) or stayed at (i.e., if the company did not move).
- At least one of the region symbols on the creature’s card matches one of the region types the company moved through this turn (see below). If the creature’s card has two region symbols of the same type (i.e., a deep wilderness creature), then the company must have moved through at least two regions of that same type.
Clarification: Two wilderness symbols are required in a site path to play a deep wilderness creature. However, the two symbols need not be adjacent in the site path. For example, a deep wilderness creature may be played keyed to the site path: ![]()
![]()
![]()
![]() . If a company travels with two wilderness on its site path, the chance of encountering very dangerous wilderness monsters has doubled, even if the two wildernesses are not adjacent.
. If a company travels with two wilderness on its site path, the chance of encountering very dangerous wilderness monsters has doubled, even if the two wildernesses are not adjacent.
If a creature satisfies more than one of these conditions, you must choose (when you play the creature) one of these conditions that the attack is “keyed to.” The effects of certain cards are based upon the region or site type that a creature is keyed to.
Clarification: The player that plays a hazard creature must specifically state the type of region or site that a creature is keyed to-it can affect the use of other cards. For example, if a character with an Elven Cloak faces a strike from a creature that has been played keyed to wilderness, he can tap the cloak to cancel the strike. However, if such a strike is keyed to border-lands, he cannot use his cloak against it.
The region types that a company moves through during a given turn are determined by the following criteria:
- If a company did not play a new site card, it did not move through any regions-so, no creature may be played based solely on region conditions.
- If the company was at a Haven and has played a new non-Haven site card (but no region cards), the region types are indicated by the new site card’s site path.
- If the company was at a Haven site and has played a new Haven site card (but no region cards), the region types are indicated by the new Haven site card’s “Site Path from” the old Haven site (i.e., the site path from the old Haven).
- If the company was at a non-Haven site and has played a new Haven site card (but no region cards), the region types are indicated by the site of origin’s site path (i.e., the site path on the site that the company left).
Standard Game Only: If the company played region cards, the region types of the site path are indicated by the region cards (i.e., each region card has a region type).
Example: Certain card combinations make a specific card more powerful and allow it to be played more often. Ren the Unclean (a Nazgûl) has one strike with a prowess of 15 and can only be played keyed to dark-domains and dark-holds. However, if played in combination with a Fell Beast card, Ren has two strikes with a prowess of 13 and can be played keyed to shadow-lands, shadow-holds, dark-domains, and dark-holds.
If Ren is played in combination with a Fell Beast card and a Morgul-knife card, he has two strikes with a prowess of 15 and can be played keyed to shadow-lands, shadow-holds, dark-domains, and dark-holds. In addition, one character wounded by his attack receives 4 corruption points due to the Morgul-knife.
STORING CARDS
During your organization phase, you may store any of your items that are at a Haven site. The controlling character must make a corruption check before an item can be stored.
A stored item is placed in your marshalling point pile and still counts for marshalling points. Once an item is stored it may not be unstored and brought back into play. The One Ring may not be stored.
Some items and resource cards state that they can be stored when at a specific site (e.g., the Book of Mazarbul can be stored at a Dwarf-hold). Such an item or resource card is still placed in the marshalling point pile and cannot be brought back into play.
Clarification: Certain cards state that a character bearing such a card cannot untap until the card is stored at a certain place. After storing such a card, the character does not untap until the untap phase of his player’s next turn.
Clarification: Unless stated otherwise on the card, the marshalling points for a card that can be stored apply regardless of whether or not the card is stored.
TRANSFERRING ITEMS
During your organization phase, you may transfer items between characters at the same site. The controlling character must make a corruption check before an item can be transferred.
Clarification: A corruption check is required before an item can be stored or transferred. A character that fails such a corruption check has decided not to follow his Wizard’s advice and influence concerning the item’s use (i.e., the item is discarded and the character is either discarded or eliminated).
ACTIONS AND CARD PLAY
The various activities that you and your opponent can perform during play are called actions. Typical actions include playing a card, tapping a card, revealing a card, etc. The following general guidelines apply to resolving actions; more detailed guidelines can be found on pages 61-63.
- You must give your opponent a chance to respond to every action, and vice versa. If you perform an action and move on to another action without giving your opponent a chance to respond, you must “back up” if he indicates that he wants to respond. A series of declared actions made in response to one another is called a chain of effects. You always have the option of declaring the first action in a chain of effects during your turn. The actions in a chain of effects are resolved one at a time from last declared to first declared (i.e., the last declared action is resolved first, then the second to the last, etc.).
- If the play of a card requires other actions (e.g., corruption checks), the actions are resolved in the order in which they appear on the card.
- A required or declared dice roll is an action and can be the target of another action or effect declared later in the same chain of effects.
- When the effects of a dice roll require further actions (e.g., a roll for a strike requires a body check), those actions become the first actions (any further rolls come first) in the next chain of effects after the roll.
PART II · STANDARD RULES
You should read and master the Starter Rules before tackling the Standard Rules.
1 · THE VICTORY CONDITIONS
The Standard Rules victory conditions differ from those found in the Starter Rules in two ways. First, the players can decide to play a longer game, and/or second, certain modifications to the marshalling point totals can be made at the Free Council.
THE LONGER GAMES
The Starter Game is also called the “1-deck game.” For experienced players with tuned decks, this game usually lasts 20-60 minutes. If you want longer, more detailed play, there are 3 other games.
The 2-deck Game
In a “2-deck game” (the “short game”), the Council is called when each play deck has been exhausted twice. You may call the Council when your play deck has been exhausted twice, or when it has been exhausted once and you have at least 25 marshalling points (MPs).
The 3-deck Game
In a “3-deck game” (the “long game”), the Council is called when each play deck has been exhausted three times. You may call the Council when your play deck has been exhausted three times, or when it has been exhausted twice and you have at least 30 marshalling points. Increase the sideboard size to 20 cards.
The 4-deck Game
In a “4-deck game” (i.e., the “campaign game”), the Council is called when each play deck has been exhausted four times. You may call the Council when your play deck has been exhausted four times, or when it has been exhausted three times and you have at least 40 marshalling points. Increase the sideboard size to 25 cards.
MARSHALLING POINT MODIFICATIONS
At the Free Council, you may reveal any unique marshalling point cards in your hand that match unique cards that your opponent has in play. Each such revealed card reduces your opponent’s marshalling point total by one.
There are six different types of marshalling points; each is associated with a specific shape:
| Character Points | |
| Item Points (Major, Greater, & Rings only) | |
| Faction Points | |
| Ally Points | |
| Kill Points (from defeating creatures) | |
| Miscellaneous Points |
These types of marshalling points can affect your marshalling point total in two ways:
- If your opponent has zero (or negative) points for any one type of marshalling point, your points for that same type of marshalling point are doubled. This doesn’t apply to kill points and miscellaneous points.
- No more than half (round up) of your final marshalling points can come from any one type of marshalling point. If one type of marshalling point is over half of your total, reduce the points for that type until they are only half (or less) of your total.
Clarification: These marshalling point modifications do not apply until the Free Council actually takes place. Specifically, the modifications do not affect your marshalling point total when it is used to determine if you can call the Free Council (i.e., you need 20 MPs to call the Free Council before any of these modifications are made).
Example: Let’s look again at our example from page 11. Assume Jason failed to play the Men of Northern Rhovanion (3 MPs) on his last turn. Assume none of the characters failed a corruption check (i.e., they all come to the Free Council).
Jessica notices that Jason has no faction points (he blew his roll to get the Men of Northern Rhovanion). So her faction points are doubled to 4.
Unfortunately, Jason’s problems are not over. He failed to get the 3 MPs from the Men of Northern Rhovanion; so his MP total is only 14-8 of them are character points and only 6 are non-character points. Since you cannot have more than half of your points from any one source, Jason only gets 6 MPs from his characters.
At this point, the marshalling points (MPs) break down as follows:
| Jessica’s MP Cards | MPs | Modified MPs |
|---|---|---|
| Celeborn | 2 | 2 |
| Elladan | 1 | 1 |
| Gildor Inglorion | 1 | 1 |
| Legolas | 2 | 2 |
| Sword of Gondolin (item) | 2 | 2 |
| Men of Lebennin (faction) | 2 | 4 |
| Gwaihir (ally) | 2 | 2 |
| Dreams of Lore (misc) | 2 | 2 |
| Total | 15 | 17 |
| Jason’s MP Cards | MPs | Modified MPs |
|---|---|---|
| Beorn | 2 | 2 |
| Faramir | 2 | 2 |
| Imrahil | 2 | 2 |
| Théoden | 2 | 0 |
| Sword of Gondolin (item) | 2 | 2 |
| Great Shield of Rohan (item) | 2 | 2 |
| Quickbeam (ally) | 2 | 2 |
| Total | 14 | 12 |
At this point, Jason reveals that he has cards for Gwaihir, Legolas, and Elrohir in his hand (he was saving them for this). Since they duplicate three of Jessica’s unique MP cards, her MP total is reduced by one for each of these cards. Thus, Jessica ends up with 14 MPs and Jason ends up with 12 MPs-Jessica wins. Jason curses his luck because he failed to bring the Men of Northern Rhovanion into play on his last turn.
2 · THE CARDS AND DECKS
In addition to the normal location deck and play deck, you can have a 15 card “sideboard” deck. A sideboard can contain resource, hazard, and character cards. However, the combined play deck and sideboard can only contain one of each unique card and a maximum of three of any non-unique card.
Using Your Sideboard When You Exhaust Your Deck
Whenever you exhaust your play deck, you may exchange (before reshuffling) up to 5 cards between your sideboard and discard pile. Each such card taken from your sideboard must be replaced by a card from your discard pile.
Using Your Sideboard When You Tap Your Wizard
During your organization phase, you may tap your Wizard to bring up to 5 resource and/or character cards from your sideboard into your discard pile.
Alternatively, if your play deck has at least 5 cards, you may tap your Wizard to bring one resource card directly from your sideboard into your play deck (reshuffle).
Using Your Sideboard When You Tap a Nazgûl
During your opponent’s movement/hazard phase, you may tap one of your Nazgûl permanent-events in play to bring up to 5 hazard cards from your sideboard into your discard pile. The normal result of tapping a Nazgûl does not apply. The Nazgûl is discarded. Tapping a Nazgûl in this fashion does count against the hazard limit.
Alternatively, if your play deck has at least 5 cards, you may tap a Nazgûl permanent-event to bring one hazard card directly from your sideboard into your play deck (reshuffle).
Clarification: Your opponent may verify how many cards move to and from your sideboard, but you do not have to reveal what those cards are.
Clarification: Your combined play deck and sideboard cannot violate the 1 unique card and 3 non-unique card limit. However, there is no restriction on the mix of hazards, resources, and characters in your sideboard. That is, for the purposes of your sideboard, you can ignore the play deck restrictions: the limit of 10 characters and the 50/50 resource/hazard mix.
3 · GETTING READY TO PLAY
Add your region cards to your location deck. See Movement for more information on how to use these cards.
Note: For play balance, we recommend both players have access to approximately the same number of region cards. If this cannot be achieved, region cards should not be used.
4 · FULL PLAYER TURN SUMMARY
Untap Phase
Each of your characters may do one of the following:
- Untap or
- Heal (if at a Haven site).
Untap all of your other tapped non-site cards.
Organization Phase
The following actions may be taken in any order:
- Play a character card or a Wizard card (if allowable).
- Reorganize your characters at the same Haven into any number of companies.
- Shift your characters between being controlled by general influence and being controlled by direct influence.
- Transfer items between your characters at the same site. A corruption check is required for the character giving up an item.
- Store items or other designated resources from your companies at a Haven site or at sites specified on the item cards. A corruption check is required for the character giving up an item.
- Each of your companies may do one of the following:
- Stay at its current site.
- Play another site (face down) that can be moved to (i.e., reached) directly from the company’s current site. This is the company’s new site card.
- Standard Rules Only:Play a new site card and a series of up to four specific regions that connect the current site with the new site (see Movement).
Long-event Phase
- First, remove all of your resource long-events already in play.
- Then, play any new resource long-event cards.
- Finally, remove all of your opponent’s hazard long-events.
Movement/Hazard Phase
Follow this procedure for each of your companies. You decide which of your companies goes first, second, etc.:
- If the company has a face down site card (i.e., its new site card), turn it over. Your company’s current site becomes its site of origin.
- If the company is not moving, no cards are drawn. If the company is moving to a non-haven site, you may draw up to the number of cards indicated by the site that it is moving to (at least one card must be drawn); your opponent does the same. If the company is moving to a haven site, you may draw up to the number of cards indicated by the site that it is moving from (at least one card must be draw); your opponent does the same.
- Your opponent plays hazards on the company-each hazard is resolved as indicated in its text. These hazards are played and resolved one at a time and in some cases may not directly affect the company. A hazard may not be played if it targets a different company or a character in a different company.If the company is not moving, hazard creatures may only be keyed to the company’s site of origin. Hazard creatures must be “keyed to” the moving company’s site path and/or new site. If a creature is keyed to more than one region type and/or site type that applies, your opponent decides which one is used.
The maximum number of hazards that may be played on a company during a given movement/hazard phase (i.e., the hazard limit) is equal to the size of the company or two, whichever is larger (Hobbits count half, round up). The hazard limit is determined for each company at the beginning of the movement/hazard phase (e.g., it remains fixed).
- If the company has been required to return to its site of origin, return the new site card to the location deck (or discard if it is tapped) and proceed to step 6 (the site of origin becomes its current site). No additional hazards may be played on that company.
- Remove the company’s site of origin (i.e., the site the company came from). Discard the site card if it is tapped and not a Haven. Otherwise, return it to the location deck.At this point, the company is considered to have arrived at the new site (i.e., its new site becomes its site of origin). Standard Rules Only: Return any region cards to the location deck.
- You must discard any cards in excess of eight in your hand; your opponent does the same for his hand. If you have fewer than eight cards, you must draw cards until your hand has eight cards; your opponent does the same for his hand.
Note: Repeat steps 1-6 for each of your companies.
Site Phase
In the order you decide (i.e., you decide which goes first, second, etc.), each of your companies at an untapped site may:
- do nothing or
- follow this procedure:
- You decide to enter and explore the site.
- If the site has an automatic-attack, it attacks the company. The attack is resolved normally (see Combat).
- The company may attempt to play one item, ally, faction, or information resource card that is “playable” at that site. Generally, this will involve tapping the character that will control the card played. If the resource card is successfully played, the site card is tapped and one additional character may tap to play a minor item. Certain resource cards other than items, allies, factions, and information will state the conditions under which they may be played. Such cards may be played at tapped and untapped sites, and do not tap a site when played (e.g., Return of the King, Lucky Search, etc.).
Standard Rules Only: One of your characters or your Wizard may attempt to influence away one of your opponent’s characters, followers, allies, factions, or items (if it is at the same site).
End-of-Turn Phase
You may discard one card. Then you must draw or discard cards until your hand has 8 cards. Your opponent does the same.
5 · CHARACTERS & COMPANIES
There are several Standard Rules changes involving characters and companies.
JOINING TWO COMPANIES AT A NON-HAVEN SITE
During the organization phase, two companies may move to the same site, but one of the following cases must apply:
- One and only one company may already be at the site. In this case the other company must state that its new site card is already in play (the current site card for the non-moving company).
- One company moves to the site using the site path on that site card (i.e., the company starts at the site’s nearest Haven), and the other company moves to the site using region cards for its site path. In this case, both companies must state that the same face down site card is their new site card.
In both cases, the two companies must face hazards separately and are then combined at the end of the movement/hazard phase.
DISCARDING CHARACTERS
Instead of bringing a new character/Wizard into play during your organization phase, you may discard a character that is at a Haven or at his home site. A Wizard may not be discarded.
You must take this action when you are forced to discard a character due to a lack of available influence. In this case, the character(s) need not be at a Haven.
BRINGING CHARACTERS INTO PLAY
Before you play your Wizard, you may use general influence to bring a character into play at any haven or at his home site. After revealing your Wizard, you may use general influence to bring a character into play only if your Wizard is at the site at which the character arrives (i.e., a Haven or the character’s home site).
SPLITTING A COMPANY AT A NON-HAVEN SITE
During the organization phase, a company at a non-haven site may split into two or more companies. The following instructions apply:
- One of the companies may remain at the current site.
- One of the companies may return to the Haven site indicated by the current site’s site path.
- Any other companies must move to different sites using region movement.
Clarification: These restrictions mean that two companies may not start at the same site and then move to the same site separately (i.e., in such a situation the two companies would have to move as one company).
6 · MOVEMENT
There are two ways to move from one site to another. A company can use the site path on a site card (see the Starter Rules) or it can use region cards as its site path to a specific site card (i.e., region movement).
Clarification: Region movement is not necessary to play this game. Region movement just gives you more options; i.e., with region movement a company need not move to a Haven every other turn. Region cards are not included in starter decks.
REGION MOVEMENT
To use region movement, play a new site card (face down) and a series of up to four regions (face down) that connect the company’s current site with the new site (i.e., the company moves). A series of regions “connects” two sites if:
- The current (i.e., site of origin) site is located in the first region, and
- That region card is adjacent to the next region card played, and
- That region card is adjacent to the next region card played, , and
- Finally, the last region card played is the region that the new site card is located in.
A region is adjacent to another region if and only if each region lists the other region on its card.
Clarification: To use region movement for a company, the region cards played must include the region containing the company’s current site and the region containing the new site. If both the current site and the new site are in the same region, only that region card need be played.
Clarification: If two sites are separated by more than four regions, a company may not travel directly between them in one turn (unless some special resource card is used, e.g., Bridge, Shadowfax, etc.). The company must first travel to interim sites (one per turn) until it reaches a site that is within four regions of the destination site.
Clarification: Certain regions may appear to be adjacent on the maps, but turn out not to be adjacent upon examination of the lists on their cards. For example, Dagorlad and Rohan appear to be adjacent on the maps, but they are really separated by the Anduin River.
Playing Hazards
For the purposes of playing hazards, the site path for a company using region movement is defined by the region types of the region cards played. You can use a creature hazard to directly attack one of your opponent’s companies if at least one of the region types on the creature’s card matches that region type of a region card played by the company (two are required for creatures that require two symbols of the same type) .
Example: Lets look at our example for movement from the Starter Game. Jessica’s company in Bree (in the Arthedain region) wants to move to Thranduil’s Halls (in the Woodland Realm region) in order to bring the Wood-elves faction into play. If she does not use region movement, this takes three turns: Bree to Rivendell, Rivendell to Lórien, and Lórien to Thranduil’s Halls. Using region movement, she can do it in 2 turns.
The shortest number of region cards required for this move is 5 and there are two possible routes:
- Arthedain , Rhudaur , High Pass , Anduin Vales , Woodland Realm .
- Arthedain , Angmar , Gundabad , Anduin Vales , Woodland Realm .
Jessica decides on the first, less dangerous route. However, it is more than 4 regions long, so her company must first move to another site along the way. Jessica looks at her hand and sees that she has a Precious Gold Ring, so she decides move to Gladden Fields (in the Anduin Vales) to try and get the ring on her way to Thranduil’s Halls (why waste a turn).
On her first turn, she moves to the Gladden Fields by playing the Gladden Fields site and the following regions: Arthedain ![]() , Rhudaur
, Rhudaur ![]() , High Pass
, High Pass ![]() , Anduin Vales
, Anduin Vales ![]() .
.
On her second turn, she moves to Thranduil’s Halls by playing the Thranduil’s Halls site and the following regions: Anduin Vales ![]() , Woodland Realm
, Woodland Realm ![]() .
.
7 · COMBAT
An untapped character that is not the target of a strike may tap to support a character in the same company that is the target of a strike. The target’s prowess is modified by +1 for each supporting character.
Example: A Cave Drake (two strikes, 10/-) attacks your company which consists of the untapped characters: Bilbo, Balin, Bofur, Beretar, and Beregond.
You opponent assigns the two strikes to Bilbo and Balin. You play a Halfling Stealth to cancel the strike against Bilbo. Balin is carrying the Arkenstone, so you really want to keep him alive. You tap Balin to face the attack, and you tap Bofur and Beregond to support him. You would also like to tap Bilbo for support, but you cannot-he was assigned a strike, so he is still a target of this attack.
Balin has a prowess of 6 versus this attack: 4 (his own prowess) + 1 (Bofur’s support) + 1 (Beregond’s support).
8 · CORRUPTION
Before the roll is made for a corruption check, you may tap other characters in the same company as the character making the check. The corruption check is modified by +1 for each such character and/or Wizard tapped.
Clarification: If more than one character in a company are forced to make corruption checks, the corruption checks are resolved one at a time in an order chosen by the player controlling the characters. Each character tapped may only give a +1 modification to one corruption check, not to all of the corruption checks.
Clarification: When the Free Council is called, a character may only tap to give a +1 corruption check modification to another character in the same company.
Example: Your company consists of the untapped characters: Bilbo, Balin, Bofur, Beretar, and Beregond. A Weariness of the Heart is played on Balin, requiring him to make a corruption check.
Balin is carrying the Arkenstone (4 corruption points) and some Healing Herbs (1 corruption point), so you tap Bilbo and Beregond to help him with his corruption check. Balin has a corruption point total of 5, but his roll is modified by +2 (+1 for Bilbo and +1 for Beregond). He will only fail if he rolls 3 or less.
9 · INFLUENCE
Influence is the only way that your characters can directly affect your opponent’s resources. During your site phase, one and only one of your characters may tap to attempt to influence away one of your opponent’s characters, followers, allies, factions, or items. This may only take place if the influencing character and the target of the influence are at the same site. If you successfully influence the target, it is discarded. In some cases, you may reveal an identical card and attempt to play it (i.e., he convinces the target to join his side).
Such an influence attempt may not be made on the first turn, and a Wizard may not make such an attempt on the turn he is revealed.
Influencing an Opponent’s Character
To attempt to influence one of your opponent’s non-Wizard characters you must make an influence check. You make a roll (2D6) and:
- Add the influencing character’s unused direct influence.
- Subtract your opponent’s unused general influence points.
- Subtract the result of a roll (2D6) made by your opponent .
- Add any other modifications (from cards and special abilities). All modification cards must be played before making the roll.
If the modified result is greater than the target’s mind attribute, the target character card and all of the non-follower cards he controls are discarded. Otherwise, nothing happens.
If you reveal an identical character card from your hand before making the roll for the influence check, the target character’s mind attribute is treated as if it were zero. If the attempt is unsuccessful, you must discard the character card you revealed. If such an influence check is successful, the target character and his non-follower cards are discarded and the revealed character card may be immediately played (appearing at the same site). In order to play this character, you must have enough unused general influence to control him or an influencing character at the same site must have enough direct influence.
Clarification: If you reveal an identical character in order to nullify the target character’s mind attribute for an influence check, you must discard that character if you do not play him.
Influencing an Opponent’s Follower
To influence an opponent’s follower, you must make an influence check as outlined above. However, the result is also modified by subtracting the “unused direct influence” of the follower’s controlling character.
Influencing an Opponent’s Faction
To influence an opponent’s faction, you must make an influence check as outlined above. However, the following exceptions apply:
- Instead of a mind attribute, the influence check uses the value usually required to bring the faction into play (as given on the faction’s card).
- The influence check is modified by any of the faction’s applicable “Standard Modifications” (as given on the faction’s card).
- Revealing an identical faction card reduces the the value usually required to bring the faction into play to zero and allows you to play that card if the influence check is successful.
You may only influence an opponent’s factions if the influencing character is at the site where the faction was played.
Influencing an Opponent’s Ally
To influence an opponent’s ally, you must make an influence check as outlined above. However, the following exceptions apply:
- Instead of the controlling character’s mind attribute, the influence check uses the ally’s mind attribute.
- The result is also modified by the “unused direct influence” of the character controlling the ally.
- Revealing an identical ally card reduces the ally’s mind attribute to 0 and allows you to play the card if the influence check is successful.
Influencing an Opponent’s Item
To influence an opponent’s item, you must make an influence check as outlined above. However, the following exceptions apply:
- The mind attribute of the character controlling the item is used.
- The result is also modified by subtracting the “unused direct influence” of the item’s controlling character.
- You must reveal an identical item card in order to make an influence attempt on an item (i.e., you are attempting to convince the controlling character that the item would be more useful to the cause of the Free Peoples in your hands). If the influence check is successful, you may play your card with the character that made the influence check-if you choose not to play the item, discard it.
Clarification: The unused direct influence for an influence check against an item is affected by any direct influence modification that the target item gives its bearer.
Example: Jessica and Jason each have one company organized as follows:
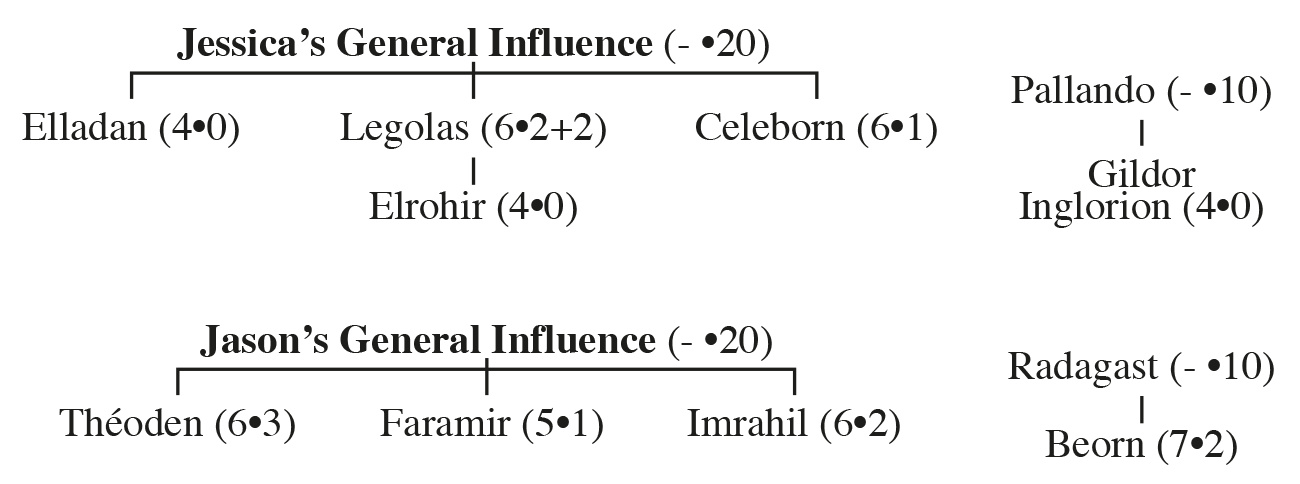
Jessica moves her company to the same site as Jason’s company. During her site phase, Pallando attempts to influence Faramir. Jessica has 4 unused general influence, Jason has 3 unused general influence, and Pallando has 6 unused direct influence. Jessica rolls 2D6 and gets a 8, while Jason rolls 2D6 and gets a 7. So the modified result of the influence check is 4 = 8 (Jessica’s roll) + 6 (Pallando’s unused direct influence) – 3 (Jason’s unused general influence) – 7 (Jason’s roll). This result is not greater than Faramir’s mind attribute of 5, so Faramir is not influenced and remains in play. If Jessica had rolled a 10 or higher, Faramir would have been discarded.
If Jessica had revealed a Faramir card from her hand before the rolls were made, his mind attribute would have been zero for the purposes of this roll. In this case, the influence check would have been successful-Jason would have discarded his Faramir card and Jessica would have played her Faramir card. He must be played as Pallando’s follower because she only has 4 unused general influence.
In the case in which Faramir is influenced, Jessica should not celebrate too much. During his turn, Jason can shift Beorn to control by general influence and then use Radagast’s 10 unused general influence points to attempt to influence one of Jessica’s characters.
10 · PLAYING AND DRAWING CARDS
There are several Standard Rules changes involving playing cards.
PLACING A CARD ON-GUARD
During the movement/hazard phase of your opponent’s turn, you may place one card on-guard for each of your opponent’s companies. This card is played face down next to the company’s new site or next to its current site if it did not move. Any card can be placed on-guard (i.e., it does not have to be a hazard, you can bluff). Such a card does count against the hazard limit for the company it is placed on.
The card will remain on that site until one of the following occurs:
- The company decides to face the site’s automatic-attack. If the on-guard card is a hazard creature keyed to the company’s site or a hazard that can modify the automatic-attack, it may be revealed before the automatic-attack is resolved. If it is a hazard creature, it will attack after the automatic-attack is resolved.
- The company plays a card keyed to the site. If the on-guard card is a non-creature hazard, it may be revealed if it is a hazard that directly affects the company or a character in the company (e.g., a hazard that forces all characters to make a corruption check).
- Otherwise, return the card to your hand at the end of the site phase.
In the first two cases, the card is handled as if it had been played during the movement-hazard phase (i.e., short-events are discarded, long-events last until your opponent’s next long-event phase, etc.).
Example: After visiting Thranduil’s Halls, Jessica’s company moves to The Lonely Mountain. During her movement/hazard phase, Jason places a card on-guard. The card is Awaken Denizens, but Jessica does not know that. This card doubles the # of strikes for an automatic-attack at a Ruins & Lairs site.
During her site phase, Jessica states that her company will face The Lonely Mountain’s automatic-attack (a Dragon, 1 strike with a prowess of 14). Jason reveals his on-guard card and the automatic-attack becomes 2 strikes with a prowess of 14 each. Jessica’s company must face this attack (it may be canceled.
Suppose Jason had placed a Cave Drake on-guard. Then Jessica’s company would have to face the automatic-attack and then the Cave Drake.
Suppose Jason had placed a Weariness of the Heart on-guard. Then, if Jessica’s company successfully faced the automatic-attack and played an item, Jason could reveal the Weariness of the Heart to force any one character in the company to make a corruption check.
LIMITS ON DRAWING CARDS
During your turn, you may draw cards based on one of your moving companies only if the company contains a Wizard or at least one character with a mind attribute of three or more.
DICE ROLL TIMING
Before a roll is made for combat or a check, cards may be played that will modify the result of the roll. However, once the roll is actually made, no further cards may be played that modify the dice roll result. This modified result is used to determine effects of the combat or check before any other actions are taken. When the effects of a dice roll require other actions (e.g., a successful strike requires a body check) those actions become the initial actions (any further rolls come first) in the next chain of effects after the roll.
TIMING RULES
You and your opponent may both want to perform actions at the same time or actions that are sequenced with respect to other actions. This can happen during your movement/hazard phase (or during your site phase if your opponent has a card on-guard). Such actions almost always include playing a card, tapping a card already in play, and revealing an on-guard card.
Your opponent may always declare an action in response before your action is resolved. Then, you may respond to his action, and he can respond to your second action, and so on until neither player can (or wants to) perform an action.
You must give your opponent a chance to respond to every action, and vice versa. If you perform an action and move on to another action without giving your opponent a chance to respond, you must “backup” if he indicates that he wants to respond.
Such a series of declared actions is called a chain of effects. You always have the option of declaring the first action in a chain of effects during your turn. The actions in a chain of effects are resolved one at a time from last declared to first declared (i.e., the last declared action is resolved first, then the second to the last, etc.).
You may follow one of your declared actions with another of your declared actions in the same chain of effects, so long as you give your opponent a chance to respond to first action.
An action in a chain of effects is negated if the conditions required to perform it are negated by another action that is resolved before it in the chain of effects.
Timing Example: You play Weariness of the Heart on Bilbo to force him to make a corruption check. Your opponent taps Frodo (2nd action in this chain of effects) to give Bilbo +1 to this check. You play Call of Home on Bilbo (3rd action), which forces Bilbo to make a successful roll or return to his owner’s hand. Finally, your opponent plays Tookish Blood on Bilbo. This cancels any effect for the rest of the turn which would discard Bilbo or send him to his owner’s hand. Now you resolve actions from last to first:
- Tookish Blood takes effect.
- Call of Home takes effect, but Tookish Blood negates any effect it would have.
- Frodo gives +1 to Bilbo’s corruption check (an action can target a dice-rolling action that was declared earlier in the same chain of effects, even though the dice-rolling action has not taken effect).
- Bilbo makes his corruption check-he rolls the dice adding +1 to his roll because of Frodo’s help (other modifications not discussed here). Tookish Blood cancels any result of this corruption check that would discard Bilbo.
If your opponent had played Tookish Blood on Bilbo after his dice roll, i.e. after this chain of effects was resolved, it would not have affected your Call of Home nor Bilbo’s corruption check. Tookish Blood only cancels those actions that occur during the rest of the turn, and not prior actions.
Consider if Tookish Blood had not been played and if you played Call of Home on Frodo. First Frodo rolls for Call of Home when resolving the chain. If he fails this check, Frodo goes back to your opponent’s hand. The 2nd action in the chain would then be negated because the conditions required to perform it, namely Frodo being in Bilbo’s company, were negated by your Call of Home.
PART III · OPTIONAL RULES
Each of these optional rules may be used if all players agree before the game begins. Refer to the appendices (page 86) for conventions of tournament play — these are widely used for casual play.
Special Movement to Gorgoroth Rules — A company may only move to or from a site in Gorgoroth (e.g., Barad-dûr, Mount Doom) by using one of the following:
- Specific region movement from a site in Imlad Morgul (Cirith Ungol, Minas Morgul, or Shelob’s Lair).
- Specific region movement that passes through Nurn or Udûn.
Burglaring — A Hobbit may attempt to “burglar” at an untapped site. If you decide to make a burglary attempt, make a roll. If the result is greater than 5, the Hobbit taps the site without facing the automatic-attack and may tap to play an item that is playable at that site. Otherwise, the Hobbit faces the automatic-attack alone.
Recently Visited Sites — If a site is in the opponent’s discard pile, the number of strikes and prowess for the site’s automatic-attack are increased by 1.
Tapping to Face Multiple Strikes — A character can tap, take a -3 mod, and face two strikes.
MULTI-PLAYER RULES
Except for the guidelines presented in this section, a multi-player game (3-5 players) uses the normal rules.
Victory Conditions: The normal rules are used for victory conditions and to determine when the game ends. However, when a player calls the Free Council, each of the other players gets to take one final turn. If a player’s Wizard is eliminated, that player is out of the game; however, the game only ends in this manner if only one player is left in the game. The doubling of your marshalling points based on a MP type only applies if none of your opponents has a card in play of that type.
Getting Ready to Play: Before the players set up their decks for play, each player makes a roll (reroll all ties). When play starts, the second highest roller will sit to the left of the high roller, the third highest roller will sit to the left of the second highest roller, etc.
The highest roller chooses the Wizard he will play, the second highest roller chooses his Wizard from the remaining Wizards, etc. Each player may place up to two of his Wizard cards in his play deck.
At this point each player should have his play deck constructed. For multi-player games, half (round up) of the hazards in your play deck must be hazard creatures.
Each player should select a character pool of up to 25 characters. The low roller reveals a character from his pool; this character starts in play. Then, the player to the right of the low roller reveals a starting character that has not already been revealed. This process continues in a counter-clockwise direction until all players have revealed their starting characters as outlined in the normal rules (i.e., 1-5 characters with a 20 or less mind attribute total). Then, each player may place up to 10 characters from their character pool into their play decks.
After the characters are all revealed, each player may exchange up to three cards between his play deck and his cards not being used (all normal play deck restrictions must be met).
The highest roller takes his turn first. Then, the player to his left takes his turn, and so on (i.e., play proceeds clockwise).
The Player Turn: Your “hazard-opponent” for the purposes of hazards is the player to your left. During your Long-event Phase, you remove your own resource long-events and the hazard long-events belonging to your hazard-opponent. Only your hazard-opponent may draw cards (based on the site being moved to) and play hazards during your movement/hazard phase. A player only has the option of discarding a card during an End-of-Turn Phase if it is his own turn or if it is his hazard-opponent’s turn.
Twilight cards can be played at any time by any player. Permanent-events, long-events, and other “global” events (e.g., tapping Ren the Unclean) affect all players.
Middle-earth: The Wizards Companion provides some expanded, variant multi-player rules.
SOLITAIRE RULES
Getting Started: Place all of your hazard cards in one shuffled deck. (Variant #1: Have someone construct a hazard deck for you. Variant #2: Construct several “well-tuned” hazard decks of approximately 25 cards each, then play against each one.) Your play deck has no hazards and must have at least 30 cards. Your hand size is only five cards.
During Play: Proceed normally, except for the following exceptions. There is no opponent’s player turn. Whenever you would draw or discard to get a hand of 8 cards, you now draw or discard to get a hand of 5 cards. During the movement/hazard phase, you draw and discard normally for each company.
Playing Hazards: During the movement/hazard phase, for each company, you draw hazard cards equal to 2 plus twice the number of hazard cards normally drawn for that site. Then you must play as many of those hazard cards as you can within the hazard limit for the company. You should play the hazards in the fashion that is most disadvantageous for your companies. Any cards requiring Doors of Night are saved and played when a Doors of Night is drawn.
Object of the Game: The object of the solitaire game is to accumulate as many marshalling points (MPs) as you
Middle-earth: The Wizards Companion provides some expanded, variant solitaire rules.